Tuesday, November 12, 2013

The Go To Gift

A few weeks ago, I started thinking stressing freaking out about what the make the kids teachers for Christmas gifts.  Once I remembered I still had SIX WEEKS (cue the hyperventilating), I relaxed and put some proper thought in to it.

Fast forward to today - and I had only a few "have to sew" things in the morning, and once I'd ticked them off, I got down to the task of the first teacher's gift.  My "go to gift" - a cushion.


Paper pieced Lonestar Cushion

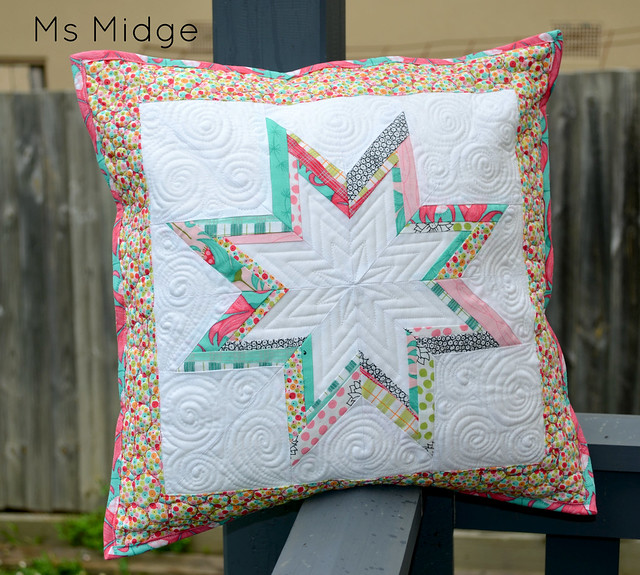
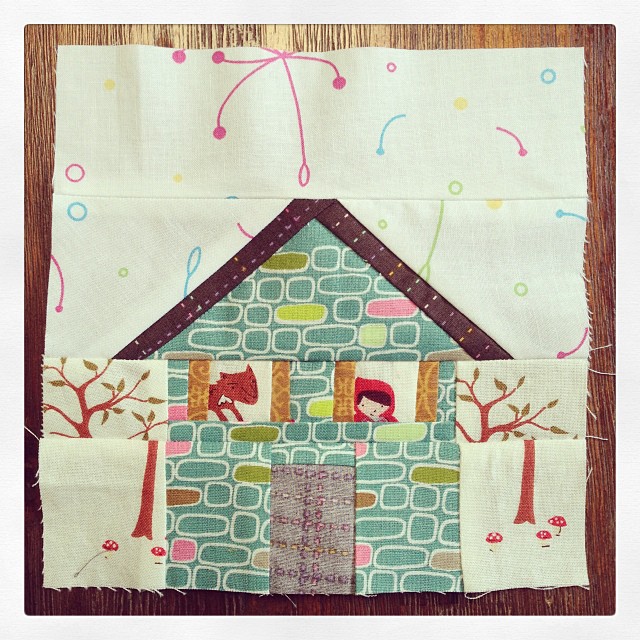
Isn't she beautiful?  I pinned THIS paper piecing pattern last week, and knew it would be perfect to use for a cushion.  And although I love the original I saw, with the coloured fabric centre, I wanted more negative space for quilting, so kept mine white.  I dragged out my bag of Sarah Fielke scraps - leftovers from my Flying By The Seat Of My Pants quilt - and got the star and borders whipped together in a couple of hours.  This is a GREAT paper piecing pattern for relative beginners.

Paper pieced Lonestar Cushion

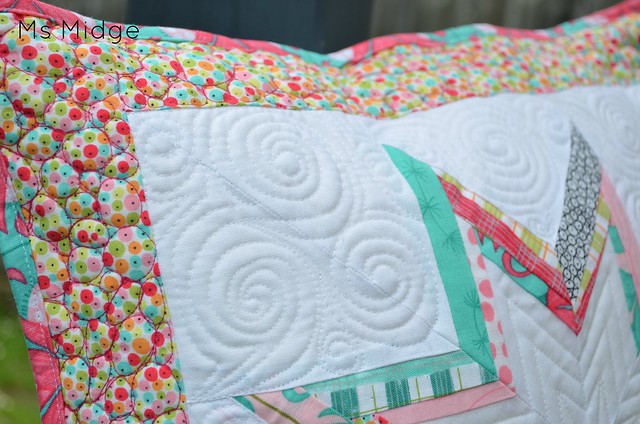
And then I got my Free Motion on!  These swirly patterns are probably my favourite in terms of free motion quilting.  They seem to be the design I do best - my stitch length is uniform throughout - something I have a bit of trouble with when doing some other designs.  I used a white Aurifil #2024  for all the negative space quilting.  I then took to pebbling the outside border.  I used my recently acquired hot pink Aurifil #1011 for this - and I LOVE this colour!  Now my pebbling is far from perfect, but I quite like it that way :)

Paper pieced Lonestar Cushion

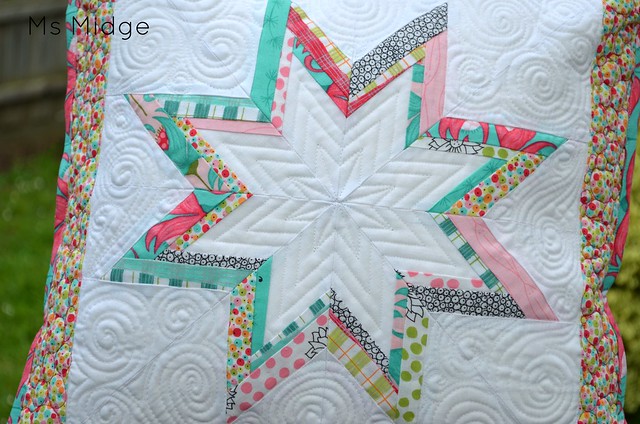
I think the straight line shadowing on the inside of the star gives it a bit of a 3D effect?  I just love it!

Paper pieced Lonestar Cushion

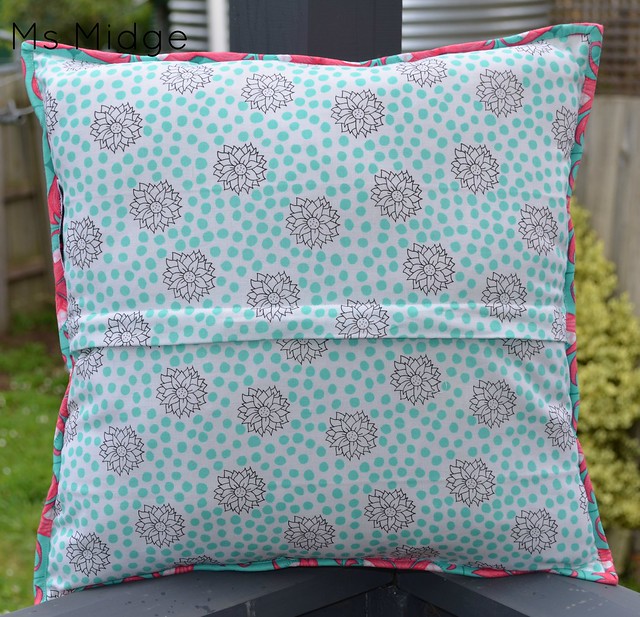
And the back?  This is from a fat quarter of the same fabric range (if you're wondering what it is, it's called "On The Pond") and was easy to make in to a concealed zipper back.  So neat.

So that's another finish off that invisible list of things to do for Christmas.  I'm happy to say that when Cadyn walked through the door from school today, and I showed him this - his eyes lit up.  He was thrilled when he saw it was for his teacher.  He has a real soft spot for this lovely lady, as do I.  She has brought out the absolute best in him, and he's gone from being a kid that was struggling a bit and was anxious about learning - to a confident young man who is excelling in his work and in her words, is eager to learn.  So, me thinks she deserves this little piece of heaven.

NOW - if you are still planning your handmade Christmas list, I have something coming up very soon, that just may interest you!  Watch this space!

I'm linking up with Sew Cute Tuesday, Fabric Tuesday and I Quilt - You can too!


Fresh Poppy Design


Sew Cute Tuesday


Friday, November 8, 2013

T.G.I.F.F. - Catching Up on Bee Blocks & Stuff!


I spent most of Wednesday catching up on my bee blocks!  I felt like I was starting to drown in them, so knocked them all out…..

For you @Luellabella the bloody door is wrong side out! Only noticed at the end  #paperpieced #wombatstew

Our Queen Bee for Wombat Stew last month was Lara.  She is going to have THE most gorgeous Houses quilt EVER!  Now, take away the fact that the door fabric is wrong way, ummmm, this block is perfect!  I will be sending some of the fabric for Lara to hopefully just appliqué on the top.  I only noticed at the end - DOH!

And number 3 #beeblock done! #paperpieced for @luellabella

And the second little house.  I love fussy cutting in paper pieced blocks!

Second #beeblock for the day!

Then it was on to my QCA Bee blocks.  Alex is November's bee and she requested a Bento Box block in low volume fabrics.  First time making one of these blocks, and I really like it!

Getting #beeblocks done today. First one done ✔️

And Kathryn was October's queen, and asked for a Mondrian block - but with very little direction.  We basically made up the design and measurements ourselves, and were told to use whatever solid colours we had. Would you believe I do not really have that many solid colours in my stash??  I was pleasantly surprised with how this turned out, and I shall look forward to the end quilt top with everyone's different colours thrown in!

Size 5 Cocoon playsuit

I also whipped up a few playsuits.  The Strawberry one was an order - and I always think when cutting out one order, I might as well make a few - production line style!  The Butterflies & LRRH playsuits are for sale on my FB Page.

Size 3 custom order Strawberries

Size 2 Little Red playsuit ♥️


Some personalised Santa sacks a friend ordered last night.... Think I might have to make new ones for my kids!

And last but not least, I got started on some Santa sacks for an upcoming school market night I'm having a stall at.  I don't do markets these days, so thought I'd get some functional and reasonably priced goodies together for sale.  Well, I did some 'market research' on my personal fb page, and next thing I know, I'd sold six of them!  So, another trip to Spotlight yesterday for more fabric to make the market sacks!

A very productive week!

I'm linking up with T.G.I.F.F. being hosted by Quokka Quilts (Go check out her awesome finish!!) - You can too!


Wednesday, November 6, 2013

W.I.P. Wednesday - What to do with a jelly roll??

A few months ago, I was lucky enough to receive a lovely parcel in the mail from none other than Kate Spain herself!  I was rewarded with such loot after being involved in the Kate Spain Blog Hop hosted by Alyce @ Blossom Heart Quilts.  Apart from the fact it had Kate's actual address on the parcel and then a lovely hand written note inside, I was very excited to find it contained a Honey Honey jelly roll as well as a charm pack of Sunnyside.  After thanking Kate profusely by every means of social media I could, I put the loot away safely for when I found something lovely to do with it.

Fast forward to last Wednesday night when I was talking to the husband about Christmas presents.  I had a bit of a light bulb moment and said "If I get time, I'll make a throw quilt for _______ ". (Keeping that bit anonymous for obvious reasons!).

Thursday night, Andrew arrived home from work to a started quilt top - and promptly laughed himself silly.  "If you have time" he says……

By Friday afternoon, I sent him a photo of this…...

Honey Honey Jelly Roll Quilt Top

The Honey Honey jelly roll in all its glory!

I knew I wanted to use it for this project, but had no idea what sort of a pattern to use?  So I googled and Pinteresteddddddd until my eyes were falling out of my head.  I then decided to just go with the flow (sound familiar?) and basically ended up with this!

Andrew chose the green for the background, but I added a 1" white border around the blocks before adding the green sashing - SOOOOO glad I did!  I think it make the blocks sing :)

So.  Another Christmas present almost ticked off my non-existent list of things to do.

I'm linking up with Freshly Pieced - You can too!


WIP Wednesday at Freshly Pieced

Tuesday, November 5, 2013

Sew Cute Tuesday - Quick & Easy Projects!

Some of you may remember I received a huge addition to my stash earlier this year?  Take a look HERE to refresh your memories!

Well, this past week has seen me cut in to some of the more treasured prints from my Japanese haul.  These are just a couple of them…...

Bunny Pouch
I made this gorgeous zippered pouch using THIS fabulous tutorial by Noodlehead.  I tried making one last year and failed miserably, so was VERY chuffed with myself this time round.  The fabric is a Joli Pomme print, and is just about my favourite in terms of quirkiness!  I mean, rabbits and owls holding umbrellas with life like apples??  LOVE!  The photos don't do it as much justice as it should have, but I was stuck with my iPhone when photo time came.


Bunny Pouch
I used some treasured Kate Spain for the lining and think it works beautifully.  I love how wide these pouches open.

Bunny Pouch
This was gifted to a work friend on Monday, but I have also managed to make another for a little Christmas stocking filler showcase coming up.  Cute yes?


And then today, I was trying to think of a gift to make for another friend's birthday, and the idea hit!  So I went ahead and made something I'd always thought I'd make "one day" - a teabag wallet!

2 cute little tea bag wallets whipped up for gifts

More Joli Pomme and some Kayo Horaguchi.  them!

And some very contrasting black and white prints for the inside.  I used THIS tutorial and let me tell you - super quick and easy!  Whipped them both up under an hour.  I can see more of these in my future…..

These two little projects are also the beginning of my gift sewing for Christmas.  SEVEN. WEEKS. AWAY. PEOPLE.  I'm trying very hard to avoid making a list of what I need to get done before then, and so far it's working!  Tomorrow I shall be back to show you a very spur of the moment quilt top I put together last week……  Another gift I can almost tick off my list that doesn't exist!  Yay me!

How's everyone else doing with their Christmas lists?

I'm linking up with Sew Cute Tuesday - You can too!


Sew Cute Tuesday

Monday, November 4, 2013

An Isosceles Puzzle - Tips for Making a Triangle Quilt

Isosceles on Point
 When I was asked to make my Isosceles on Point quilt, I was very helpfully pointed towards THIS tutorial/pattern.  This was the inspiration Larissa had found - which was very helpful indeed!  It was great to get an idea of what I was in for, however, it was  quite basic, and didn't really answer all the questions I had in this new triangle world I found myself in.  And it seems that I'm not alone.  A lot of you asked for tips and told me how scared you were of tackling triangles, so I took a bunch of photos throughout the process, and will hopefully make some resemblance of sense!

In terms of fabric yardage required, I can only tell you how much I used for a king single size.  I bought 1.25metres of each fabric, and when it was finished, I think I had about 20cm of each leftover.  The backing fabric was I think 5 yards.

The template that came in the above tutorial has a flat tip on the triangle.  Now this may make sense to some of you - but it had me stumped, and I could not for the life of me figure it out - no matter how much I googled and asked Yahoo!  So after sewing two rows of flat tipped triangles together, and noting that they were a big fat fail, I altered the shape myself.  It ended up being 5 3/4" across the bottom and 8" high.  If you print out the template from above link, you can trim it to the point!  To cut the triangles out, I cut rows of fabric 7.5" high by the width of the fabric.  Then use the template to top and tail your triangles.  I actually placed 6 layers of fabric on top of each other and cut through them all in one go - because I'm super impatient!

For the end half triangles, I cut half triangles as instructed.  BUT, if I were to do it again, I would just start and finish each row with a full triangle, and then once the quilt top was completely put together, trim it straight down each side.

Le Template trimmed.
Once I had a pile high of triangles, I then needed to figure out fabric placement.  I am still yet to have a design wall, so I was very lucky indeed to have a very organised customer/relative who had done all the hard work.  Ok, well, the first bit of hard work…..

Larissa drew up a grid of triangles, and proceeded to get her crayon on.  This was extremely helpful when it came to fabric placement.  And as you can see, I had to add an extra piece of paper and draw some more triangles.  Clearly I am not an artist in the drawing sense!  But it worked.  I used 7 different colours/hues in this quilt, but you really can use as many or as little as you wish.
Once you've got your fabric placement sorted, you need to panic get prepared to sew them together!  Make sure you have some time and patience.

Begin by taking your first 2 triangles.  Place them RST (right sides together) as shown in the photo below….
(I realise this is not the first two triangles together, but have no photo of  that!)  You want the tip of your triangle to be peeping out at the other end.
You want your little overhang to measure 1/4".  Because where that 1/4" point is, is where you start sewing your 1/4" seam.
With your 1/4" foot on your machine (or if you don't have one,  make sure you have a mark on your machine to follow) put the point of your triangle in.
This photo shows that each time you put your triangles in to sew, the needle should line up with where your overhang begins.
Sew all the way down the triangle, when you get about half way, put your needle down and get the other pointy end of your triangle and align it all together, making sure you again have a 1/4" of triangle peeking out at the end, like in the above photo.  Your stitching should end just like that.  I found it easiest to hold the little overhanging bit at the end so it didn't slip away!
This is what your triangles should look like at the end of each one.  You should have an "intersection" which forms a neat little triangle seam, with overhanging bits.
And once you've continued on adding triangles to your row, press all the seams to one side.  You will have rows of neat little triangles!
When you've got your required amount of rows completed, it's time to sew them together!  This is where some of the things I've noted earlier will come in to play……
Take two rows to be sewn together, and place them RST.  Remember which edge you will be sewing together - otherwise you will find that your fabric placement will be wrong - don't ask me how I know that……..
Get your first "intersection/point" of each row, and line them up.  The most accurate way I found, was to try and line up the points on the inside as pictured.
Once you have the points lined up, pop a pin in right at that point.  When you get to sewing it together, you will know to stop about an inch before that pin to make sure it all still lines up.
Don't worry if your points meeting up means that your top seams are out of whack.  The seams don't matter even half as much as the points!  Pin at EVERY. SINGLE. POINT/INTERSECTION.
When it comes to the actual sewing of the rows together,  where your points meet "should" be around 1/4".  However, do a little measure before you sew, then you can adjust your seam allowance accordingly.  I had to move my needle over one notch to the left, as my points were just over 1/4".

Now you just literally sew!  As you approach your intersections which have been pinned, make sure they are still lining up and that you don't have any "give" in your two triangles.  If you have to ease the fabrics together a little to ensure your points will still meet, then do it!
It was VERY hard to get a photo as I sewed across the intersection!  But you basically want your needle to run JUST across where the point of your intersection is - see photo below.
This is a great example of getting the row of stitching right across the tip/point of the triangle intersection!
And this one too!
When you manage to get the stitching really right, as in the previous two photos - this is what your points/intersections will look like on the right side - PERFECTO!
There WILL be times when you won't get it perfect - but hey - the points are still there…….  See photo below.
See - you still get the points, but there's just a little, little bit of space above and below each one.
Once I had all my rows sewn together, I trimmed off all the overhanging dog ears.  You don't have to do this, but I find it just takes away a little more bulk when you're quilting.

I also like to press my seams apart for the same reason.  
When you have it all pressed, you can feel very VERY proud of your hard work and ALL THOSE POINTS!! 
And one last photo.  I had a few peeps on Instagram ask me about my basting process when I posted this photo.  I have learnt that I can do it standing up, on my dining table (Ummmm, that sounds a little wrong, but you know what I mean!).  It saves my knees and my carpet (and again, sounds wrong).  Here's a quick explanation of how I do it….

I have quite a large dining table - it can fit 10 seats around it.  If I'm doing a quilt that is smaller in length than the table, then I place the backing wrong side up on the table top.  Making sure it is completely flattened out with no ripples etc in it, I get some thick sticky tape (cello tape) and tape the ends of the backing to the table.  I then lay the batting on top, ensuring I smooth out any ripples etc again on the backing.  I find that the batting smoothes out very easily!  Then it's time to put the quilt top on.  I fold the quilt top in half length ways, right sides together.  Then line up one end to where I want it to sit on the batting/backing.  Once I have it lined up on the end, and the sides, I place it down, and unfold over to the other end.  Again, time to smooth it all out and adjust it where necessary.

Once it's all smoothed out and where it should be, I start basting from the centre outwards, and when the whole table worth of quilt is basted, I unstick the tape from the ends, and from one side of the table, centrally, gently pull the quilt over to reveal the rest of the quilt that requires basting.  It's then a matter of smoothly that section out again.  Repeat for the other side.  And HELLO - quilt basted!

If you have a quilt that is too big to sticky tape down on your table top, it means it's usually heavy enough not to move around too much - like the triangle quilt.  It just takes a little more time to smooth out and make sure you won't have a bunched up backing!  I have to say - I haven't had any problems (yet) using this basting method!

So there you go my friends.  A sort of tutorial on how to make your own isosceles triangle quilt!  Now - go forth and triangulate?!!!?!

Related Posts Plugin for WordPress, Blogger...