Showing posts with label Fairytales. Show all posts

Thursday, December 12, 2013

Day 12 - Cushion for Christmas Blog Hop & A Custom Order First!

Day 12 people!  You just HAVE to head over to see Gina at Party of Eight: Our Story!  She has the sweetest little tutorial for a Christmas cushion!  Makes me want to get paint out.  When the kids aren't here.  Terrible mother I am…..


Anyway, there's only a couple of days left until I open the Linky party up for everyone to SHOW ME YOUR CUSHIONS!  If you're not down with the program, head on over HERE to my original post to get all the information you need, and make sure you're back here on time to link up!

Meanwhile, back at my place, I've finished my final order for the year!  Well, ever time I say that, someone else asks me to make something, so I shouldn't bet on it.  Every now and then, a customer comes to me with a new request - an item I haven't made before or made to sell before.  This happened a couple of weeks ago.  The lovely Emma had seen the Fairytale fabric I had in stock and asked whether I could make a doona (duvet) cover set for her daughter for Christmas?  Ummmmm, sure!  I've only ever made one doona cover before, but I knew it was feasible.  It was just working out a quote and getting the thumbs up.  Which I did to both.

So without further ado, here is the divine Fairytales Doona Cover Set that was posted off yesterday!

Custom order Fairytale Doona Cover set
I had to try it on my daughter's bed to make sure it all fit properly……I didn't want to take it off….
Custom order Fairytale Doona Cover set
I'd never made a pillowcase before, so had to wing it a bit……  I'll show you how I put it together at the end of this post!
Custom order Fairytale Doona Cover set
It's just a little bit patchworky…...

So, how does one make a pillowcase when one cannot find a tutorial that mentions the foldy/envelope bit that tucks your pillow in?  Well, one takes off her own pillowcase, turns it inside out and works it out from there…..

But in case you were wondering, I took some photos to show you!

First of all, I measured up the existing pillowcase.  Mine was 29" x 20".  And then the envelope section on the inside of the case is an extra 7".  So, for the pillowcase front, it is 36" x 20".  The back is 29" x 20".

On both the front and back right hand sides, I did a neat little seam with no raw edges showing.  So fold the edge over half an inch, and then again, and sew done.

Here you can see the two pieces ready to go.

Place the back on top of the front, right sides together, with the longer section to the right (with the neat seams).

Then fold the longer section over on top of the back.

Like so.  You will have the right side down on to the wrong side of the back.

Pin it all in place.

Sew the entire way around with a 1/4" seam allowance and then neaten your edges with an overlocker or serger.

And you're done!  See the fabulous little envelope inside that will hold the pillow in?

This order was actually a lot of fun to make!  And it ended up so neat I was even surprised with my efforts!  All the inside seams - even on all the sections of the pillowcase were overlocked, so it should last many years to come!

I'm linking up with Needle & Thread Thursday - You can too!

Tuesday, October 22, 2013

Fairytale Finish

Hoorah for a Fairytale Finish!  I've taken lots of pretty pictures for you all......

Fairytale Wall Hanging - Paper Pieced

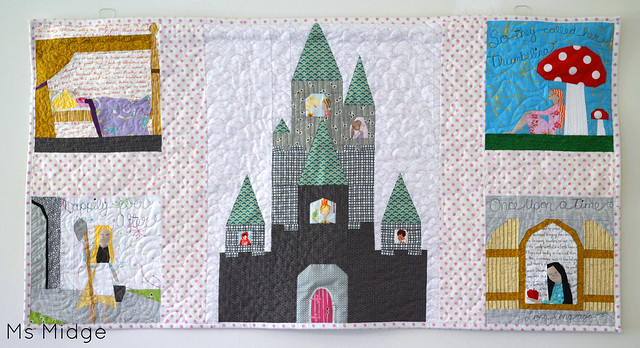
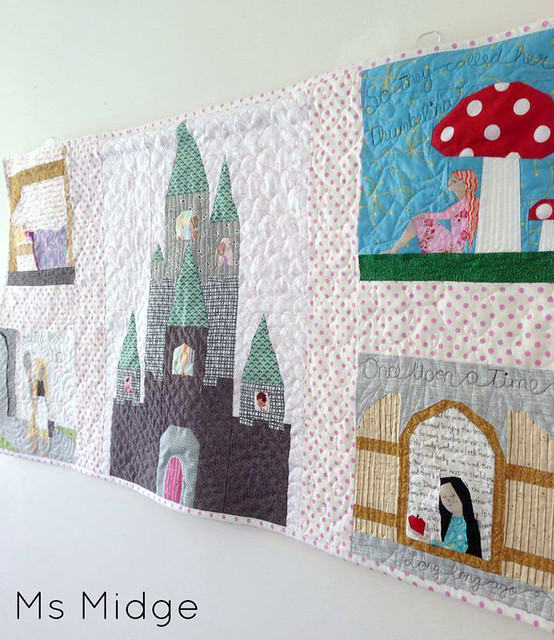
As you can see, I made my fairytale blocks in to a wall hanging.  I wanted to make something for my god daughter in Tokyo, and have already made her a quilt (only a rag quilt, she will get a "real" quilt very soon!) and cushion, so checked with her Mummy that she liked fairytales (she's 2.5 - OF COURSE she likes fairytales!), and was also told she had nothing on her walls yet.  Bingo!  
Now, I know the blue block stands out a lot more than the others, but I just couldn't come to terms with either omitting it or making another brighter hued block and omitting a different one.  So, it is what it is!

Paper Pieced Cinderella

When it came to the quilting part, I thought quite a lot about how I was going to tackle it.  I knew I wanted to free motion myself silly, but how?  I started off with one design, and then unpicked.  Started another, unpicked again.  Then just sat.  And stared.  In the end, I picked it up and just went with the flow.  Each block is completely different.

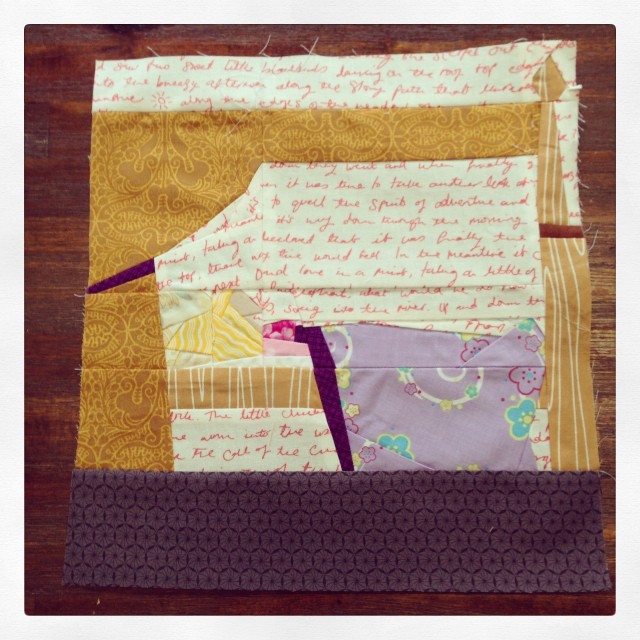
I googled each fairytale individually, because we don't actually own any of them!  I free motioned a quote from each of them.  Once the quotes were done, I whacked in a different coloured thread and had fun.

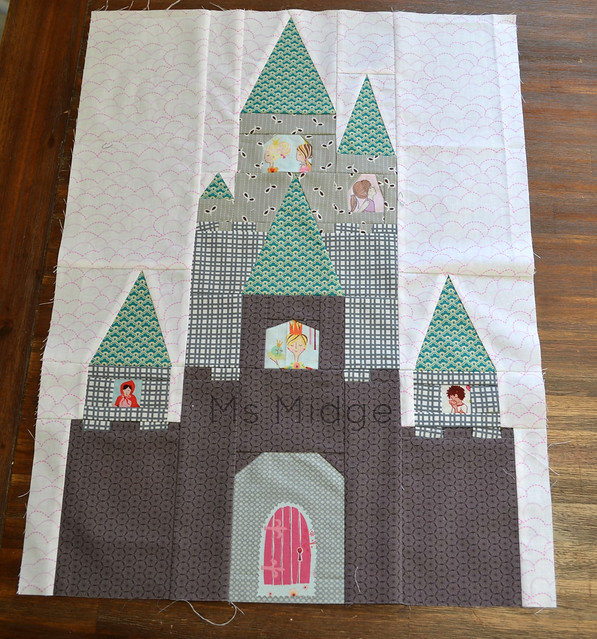
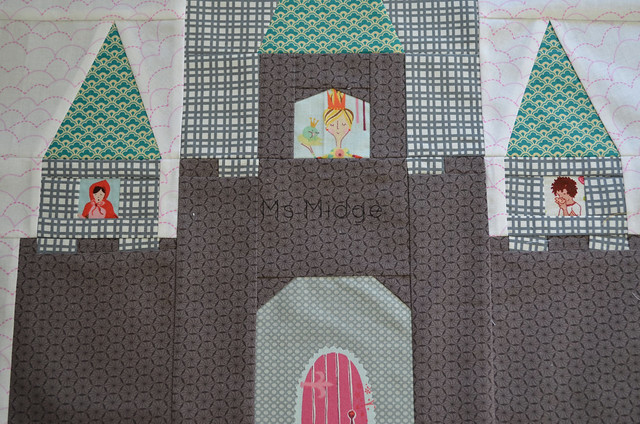
"Happily Ever After" - The Cinderella block has an organic kind of baptist fan! And then on the doorway, some sharp lines.  I've just noticed she needs a bucket handle! I was very careful not to quilt over the faces of each Princess.

Paper Pieced Sleeping Beauty

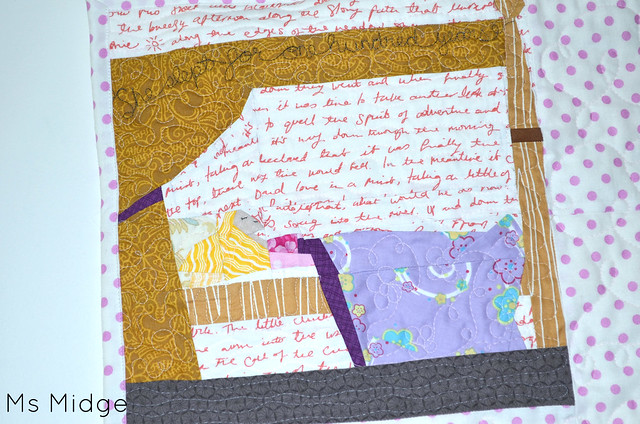
"She slept for one hundred years" - Sleeping beauty was already quite a busy block with the text print and different colour combinations.  So I stuck with some little flowers on the quilt and lots or organic lines throughout.

Paper Pieced Snow White

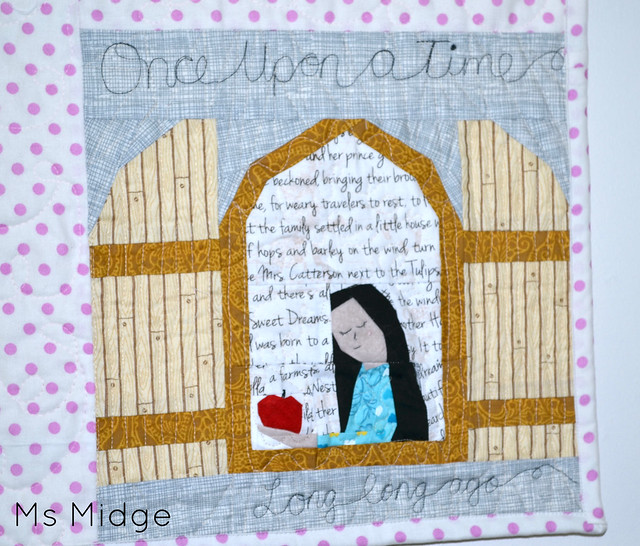
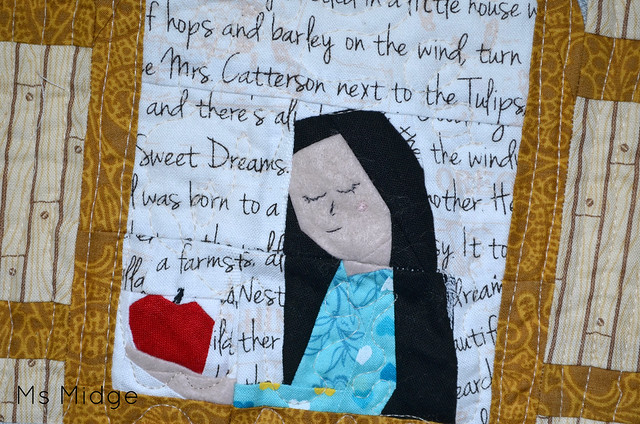
"Once upon a time, long long ago" - Snow White got some more organic straight lines.....

First attempt at face embroidery!

And was officially my first ever attempt at embroidering a face!  Oh, and an apple stalk.....  It's hard to tell, but there's also "love" free motioned on the text print.

Paper Pieced Thumbelina

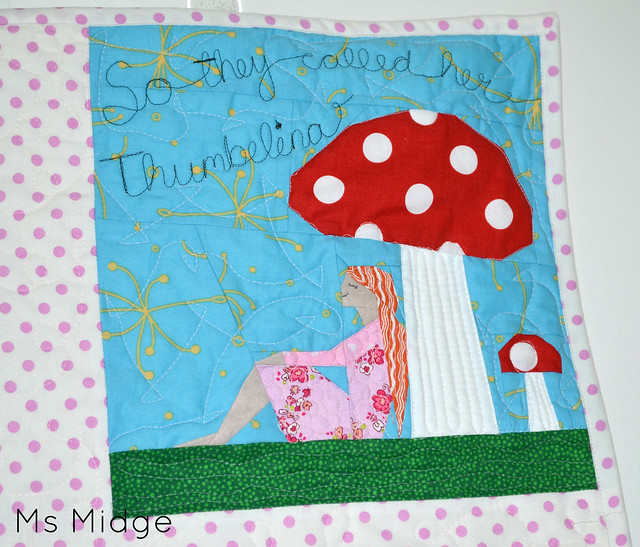
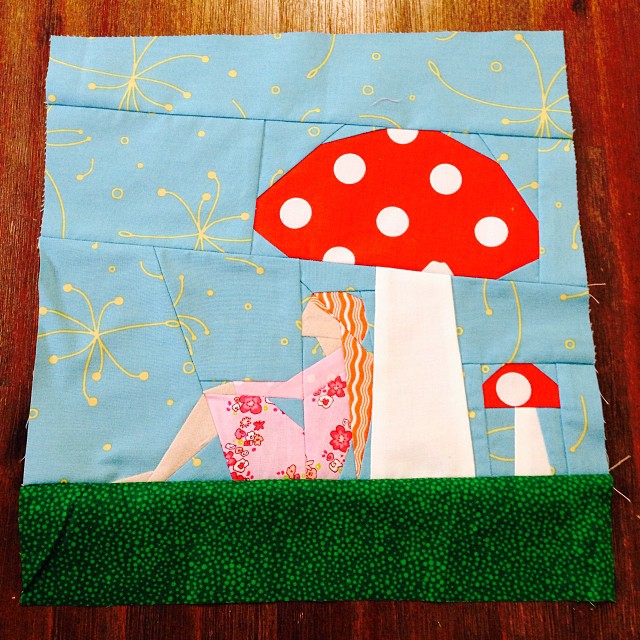
"So they called her Thumbelina" - I don't even know what to call the pattern I quilted here!  But I like it!

Paper Pieced Castle 

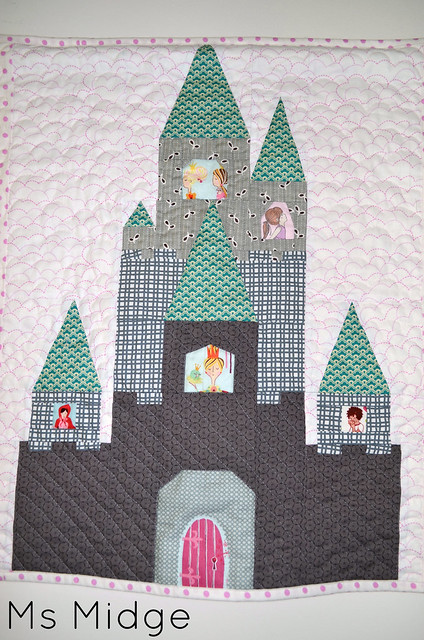
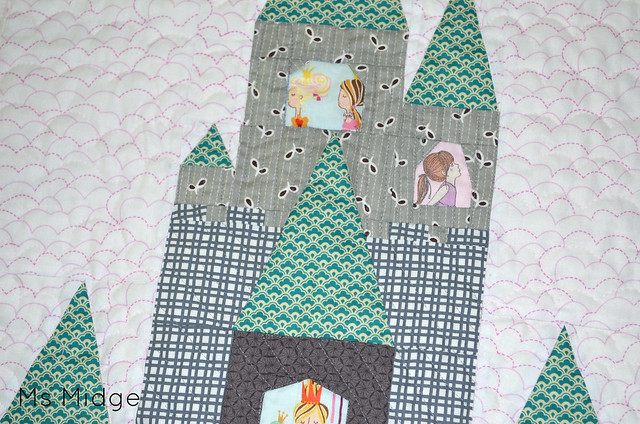
Lots of diagonal lines across the castle, and the clouds have little curved arches, the same as the fabric print.

Paper Pieced Castle 

Which makes it all cushy and cloud like....

Fairytale Wall Hanging Back - Paper Pieced 

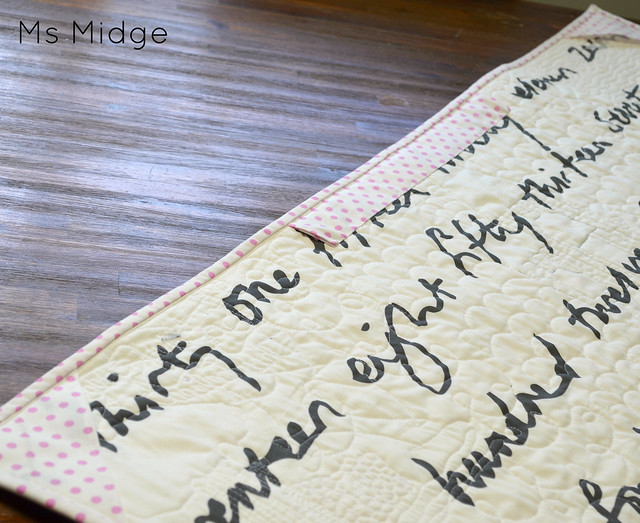
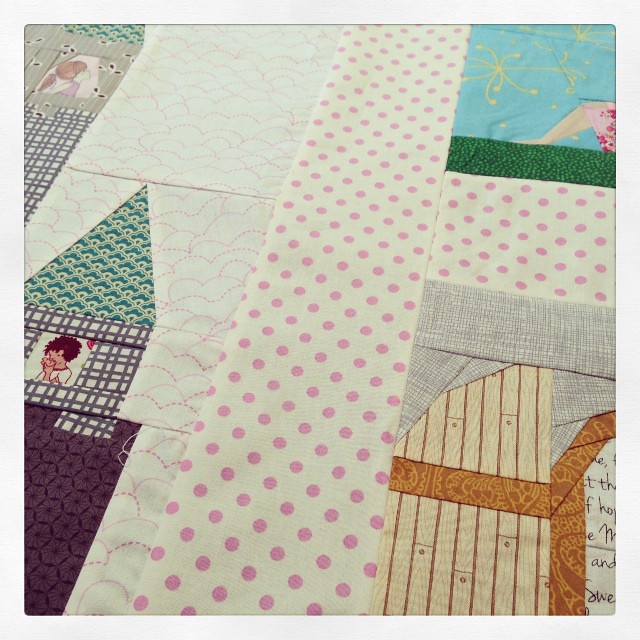
And the backing is my favourite Ikea print.  I did the hanging "pockets" the same as on my Refractatorium wall hanging.  Little triangles in the corners to slip the dowel in to, and then a 10" pocket in the middle so it doesn't sag.  More hand sewing on there - I seriously don't know what's wrong with me?!!?!

Fairytale Wall Hanging - Paper Pieced

And this photo?  Well, I took it on my iPhone, and really just love the angle!  I adore this project, and I can't wait to give it to my little god daughter when we meet up on the Gold Coast the week before Christmas!

In the details:

Finished size - 46" x 24"
Fabrics - Too many to declare!  But a special mention to a bunch of Art Gallery prints that have been sitting in my stash awaiting their calling.  The white & pink fabric used for the clouds was from a fabulous low volume bundle I bought on special from Pink Castle Fabrics - meant to be really!  That fat quarter JUST scraped in being big enough for its purpose!  The sashing and binding is a Michael Miller Dumb Dot - not so dumb really....
Thread - I used a few different colours in this project!  Aurifil #2024 white, #2605 grey/silver, #2000 sand, Aurifil #2692 black for the writing and face embroidery and because I couldn't wait for my next Aurifil delivery to get this finished, I pulled out a beautiful baby pink Gutermann I had.
Patterns - The castle is a pattern by Alyce @ Blossom Heart Quilts (not for sale YET!) and the fairytales are by Kristy @ Quiet Play, which you can find HERE.

I'm linking up all over the place this week - because I can!  And You can too!


Sew Cute Tuesday


Fresh Poppy Design


Paper Piecing Party

Friday, October 18, 2013

Fairytales Continued....

Last week, I shared with you the beginnings of a new project.  I kept plugging away at it, and have now finished all the blocks required!


3 down.... The fiddliest one yet! #paperpiecing 

Sleeping Beauty - She was super tricky!!  Pattern by Quiet Play.

And number 4! Can u tell I was child free today?? #paperpiecing 

Cinderella in her pauper days...... She looks like she could be the Grim Reaper's long lost cousin, but it really is a mop!  Oh, and I messed up with her hairline.....Just one teeny tiny little piece!  Pattern by Quiet Play.

Fairytale Castle 

And last, but most certainly not least - the fairytale castle!  This pattern was designed by Alyce over at Blossom Heart Quilts.  It is HUGE!!!!!  24.5" x 18.5" to be exact.  I absolutely LOVE it!

Fairytale Castle 

Lots of fussy cut Princesses.

Fairytale Castle 

I had a lot of fun pulling out of hair choosing fabrics for this block, but am completely wrapt with the end result!

Sashing....

So much so, that today has seen me putting this baby together!  And I've actually taken a break from quilting it, to write this blog post!

All will be revealed next week!  So be here or be somewhere else miss out check back in at some stage and you will see it!

I'm linking up with Paper Piecing Party - You can too!

Paper Piecing Party

Wednesday, October 9, 2013

W.I.P. Wednesday - Not For The Faint Hearted.....

I shared with you on Friday that I was a little addicted to paper piecing.  My decision on the weekend to start yet ANOTHER project, another PAPER PIECED project has just confirmed that I am completely NUTS!!!

You see, my friend Gina, who I "met" when we became Wombat Stew girls, is putting together the most divine Fairytale quilt known to man woman.  You can see the progress of her quilt HERE.  And when she showed us a sneak peek at the finished quilt top, I literally DIED and went to heaven!!!  And then thought "I NEED TO MAKE SOME FAIRYTALE BLOCKS".  Cos you know - I've got nothing else going on!!!!

So my other lovely friend, paper piecing pattern pusher - Kristy - agreed with me and came forth with her patterns.  HAVE YOU SEEN THEM!?!?!?!?  Amaze-balls.  But then.  I had to choose.  You see, I'm not making a whole quilt.  I'm not telling you what I'm making, cos who doesn't love a surprise??  But I had to CHOOSE!!!  Here are the first two blocks done. and. dusted.

Thumbelina
My daughter was able to figure out who this delightful little lady is.....can You?

Another block done! Now I need to figure out embroidering.... Another great #paperpiecing pattern by @quietplay
And it took my husband a bit of guessing and re-visiting his fairytale stories to work this one out.  It didn't take Alyce long to work out that I'd sewn the shutters on the wrong sides!  And it took me five minutes to decide I wasn't unpicking them, so they are decorational shutters - this Princess has shutters on the inside that shut - OK!?!?!
Now I just need to learn how to embroider teeny tiny faces...... Easy yes?  No.......

Stay tuned!

I'm linking up with W.I.P. Wednesday - You can too!


WIP Wednesday at Freshly Pieced
Related Posts Plugin for WordPress, Blogger...