Friday, March 29, 2013

T.G.I.F.F. #12 - Another Day - Another Cushion!

Another quick Friday night post from me!  I only have one finish this week, it's been another crazy few days!

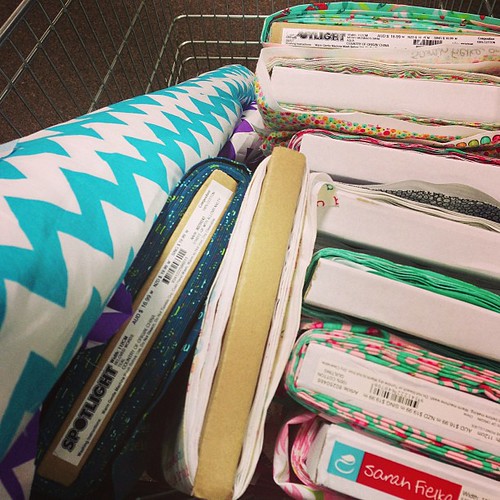
I told you the other day that we had a lovely Japanese student staying with us for a few days.  Well, I decided on Tuesday that I would make him a gift to take home.  Whipped down to Spotlight to find some Australiana fabric, and was a tad bit disappointed with their lack of choices.  However, I hastily picked a blue print with Australian animals on it.  It's a little bit kitsch, but I thought he would like it.  


The finished product!  I tried to "boy it up" with the earthy tones, so it wasn't too "cutesy"!
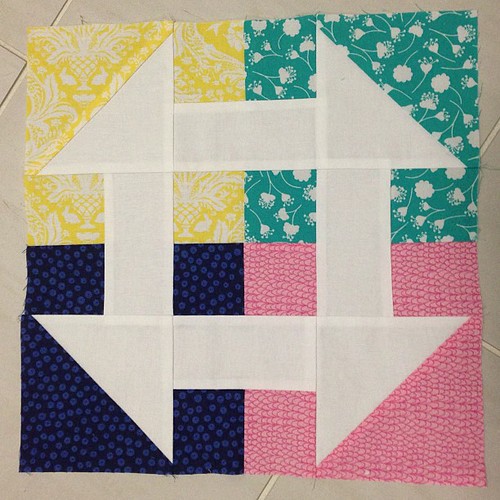
And I took out my prized collection of Aurifil (all four of them!) and chose to use a lovely silver/grey for the straight lines around the main wonky star.  I was quite pleased with myself, how straight the lines turned out, and how it does actually look like it's  pretty much on point!  It's also the first time EVER I have tried pebbling.  The rusty coloured fabric has a beautiful swirly, pebbly pattern on it, so I wanted to amplify that by pebbling over it.  It's far from perfect, but I think it works really well.  I used a gorgeous gold hued Aurifil for the pebbling.

And the recipient!  He was quite taken with his gifts.  I made him a photo book to go with the cushion, and he was quite taken with the animals.  His english improved ten fold in the four days he was here, and he was able to tell us the names of all the native Australian animals.

I used THIS wonky star tutorial for the middle block.  It was quite easy to do, and a little bit of fun - considering it didn't have to be perfectly straight!

I'm finding cushions are the perfect project for practising quilting.  I started a divine cushion cover last night, and finished over four hours of paper piecing this afternoon.......only to have my bloody iron spit rusty spots all over the crisp white fabric.  To say I was shattered would be an understatement.  I consulted Dr Google for a remedy, but it hasn't worked properly.  I am hoping and praying the spots will magically disappear so I can show you all next week!

I'm linking up with T.G.I.F.F. being hosted by Never Too Hot To Stitch!

Wednesday, March 27, 2013

W.I.P. Wednesday #14

A nice quick post from me today!  I've been flat out again, and just returned home after three hours out to find I'd left the sandwich toaster turned on.....oops!  Luckily the house is still standing.

Here is some progress on my flying by the seat of my pants quilt.  When I showed my husband the other day as I was adding rows, he asked me what it was?  I told him it was a bucket.  Clearly.  I think what he meant was, why am I making it?  Or who for, for that matter?  I'm making this because I can.  Because I love the fabric, and I'm learning some new techniques along the way.  One thing I am also learning is that my mathematical skills, or lack thereof, are not the best for making up a quilt layout!  But I'm getting there!

Apologies for the folds - but I just got it back out of my shelves and wasn't turning the iron on in 35 degrees heat!

What started as a simple little old dresden, is becoming what I think is a very beautiful potential quilt.

I was most annoyed when I got this back out to work on and realised that the "white" fabric I had chosen to use in this project, is actually more of a cream colour.  But - I wasn't going to start all over again - so upwards and onwards!

I am most impressed and in love with my little lines of geese!
I took it out in to the sunshine to photograph, but these photos really still do not give the colours of this Sarah Fielke fabric range any justice!  They are divine.

And that's it my friends!  I did start another project, but actually finished it this morning, so you shall have to wait until Friday to see it!

I'm linking up with Freshly Pieced!

 WIP Wednesday at Freshly Pieced

Monday, March 25, 2013

Some Would Say

Some people would say I am a sucker for punishment.  At times, I think I would agree with them!  Often when I think my plate can't get any fuller, it overflows.  Last Friday, I was reminded by my 14 year old that we had a Japanese student arriving today......For a split second, panic set in, but then moved along.  Until the same 14 year old told me he'd left all the information regarding said Japanese student in his locker at school.

After a quick phone call to the school late Friday afternoon, another quick phone call to the Japanese co-ordinator that evening and a fairly limited email of information close to midnight, I let it be and accepted that I would be a little unprepared for our visitor.

Fast forward to today.......  A quick re-shuffle of my work day meant that I was only five minutes late to pick him up from school - and an instant smile and a long thought out answer of "I'm good" from him meant we would be A-OK!

We have only had two weeks notice for this visit.  You see, the Australian and Japanese governments are working together to bring out these kids for an Australian experience.  This group of children are from the Minami Sanriku area in Japan.  Their town and surrounding areas were flattened by the tsunami a couple of years ago, so many of the children have lost everything.  I didn't think twice when the information came home asking for host families.

We've had conversations, albeit very quick ones, with our children about what our visitor may have been through, and I followed our Japanese co-ordinators advice and googled the town.  I was speechless.

Sooooo, it is with much pride and happiness that I have watched and listened to my children this afternoon and evening, communicating with Ryuoto (pronounced Rio-toe).  Playing Wii with him - which he told us he was very good at, and then proved it very quickly!  They've taken him over to the local park and are now sitting with him watching tv.  He loved my cooking - telling me very clearly that my roast beef was delicious!  He can stay.....

This is the third time we have had a Japanese student stay with us, and although the first experience was extremely difficult and could have quite easily put us off ever hosting again, the second time was a breeze and joy!  I am so glad that my kids are so accepting and willing to go out of their way to make someone feel so welcome.  I think by the time all four of them have made it through high school, we could have a dozen or so extra children all over the world!

Google translater getting a run for its money.....
And the universal language of gaming......Bless.

Tell me - have you ever had an international student stay with you?  Would you?  Could you?

Friday, March 22, 2013

T.G.I.F.F. #11 - Something is better than nothing?

Firstly - I must apologise profusely for my photos lately.  My little Nikon went AWOL, so it's been iPhone and Instagram only.  BUT - it's my birthday very soon, so I have put in a request for a really good camera!  Like - REALLY good.  So - those of you who own really good cameras, you know, the ones that open, shut and do everything but cook my dinner?  Please share your suggestions, recommendations etc.  We are off overseas in a few months, so I would like to grab one duty free!

In the meantime, please forgive these photos......

QCA Bee #5 Block for Alyce
In what has been a rather tumultuous week, I did manage to finish a few things!  And this gorgeous block is for Alyce (from Blossom Heart Quilts) in the QCA Bee Block #5.  Alyce challenged me - not so much in the piecing and putting together of the block, but in the fabric selection.  She requested a specific colour palette, and it tested me and my stash!  It pointed out some faults in said stash - I do not own much in the way of navy blue and/or teal green!  Does that mean I need to buy more fabric?
@blossheartblog Your bee blocks are done! Love them!
But I got there in the end.  Thank goodness for Facebook groups and the ability to post photos of different fabrics to get opinions!  I hope you like them Alyce!
Boo! Designs Pinny in Lecien & Denim
I also finally finished a custom order Boo! Designs pinny for a lovely customer Christine.  She chose the gorgeous cream Lecien floral fabric combined with a lightweight denim.....and it is divine.  It's the second time I've done the zippered back finish and I mastered it!  Yeh!
Anpanman! For @suziemori
And lastly - this gorgeous little pinny!  Another Japanese fabric, this time with a favourite Japanese cartoon character - Anpanman!  This is for my little God daughter, whom I've been told loves Anpanman!  I've also been told that her big brother will be very jealous.......

I have plans for this week.  Big plans.  Whether I can get said plans done is another thing though!  Let's hope I have a whole lot more in the way of finishes for next week!

I'm linking up with T.G.I.F.F. being hosted by Sew, Love, Live this week.

Thursday, March 21, 2013

Where I'm At - A Little Old Mental Health Check In

As I sat down this afternoon, to finish off some Ms Midge orders, I felt really bad.  I felt bad because usually I have a reasonably quick turn around on orders.  Most of the time I let customers know that it will be around two weeks from order to delivery, and I can generally get orders sorted within a week - just to surprise everyone!  But lately, things have been very slow, and for that I feel like I need to give a little bit of an explanation.

Sure, the heatwave here in Melbourne set me back a bit.  Our new house does not have air conditioning downstairs, which in turn means sewing in my little room starts resembling an episode of a fitness program - with sweat in places I don't like to sweat!  

But I have also been dealing with some other time and mind consuming issues.

I've mentioned briefly in past posts that my gorgeous sister has a mental illness, and although I don't tend to bang on about it (because hey, let's face it, it's her story to tell, not mine), there are times I would like to shout from the roof tops.  Scream to anyone who will listen.  Instead, I tend to internalise things.

What I will say is that being the only child of three who doesn't have a mental illness, is not as easy as you would think.  For me, it has been heart breaking, frustrating, infuriating, sad, confusing and mind boggling.  There were times when I couldn't be around my sister.  I had to separate myself, as a way of protecting myself.  Because I would get so overwhelmed by what she was going through, that it would inadvertently bring me to my knees, which would then affect my own family.  I have explained this to her, and thankfully, she gets it.

I try to understand.  I try to put myself in her shoes.  But I can't.  A few weeks ago, I went and saw "Silver Linings Playbook" at the cinema.  I had no idea what it was about, until after I had bought the tickets.  I cried on and off throughout the film, and then sobbed the whole drive home. And afterwards I dropped past to see my sister, to let her know that I'm trying my hardest to understand and to learn more about her mental illness - but regardless of my lack of understanding (because I don't think anyone can truly understand unless they themselves have a mental illness) I would ALWAYS HAVE HER BACK......

Which brings me to the here and now.  I'm currently advocating for my sister.  I'm making calls, sending emails and sitting in meetings with her.  I'm speaking for her, when she can't speak for herself.  And I'm crying with her.  Crying for her.  Crying all the time.  If I had collected all the tears I have shed these past few years, I could break droughts.

What I want most right now is for others to see what I see.  To see the amazing person who has been flattened by her demons.  To see that although on the outside, she portrays to the world a wild, whacky and weird woman - on the inside, she is fragile, determined, a little bit broken and a little bit weird, but most of all she is WONDERFUL.  And to see that she needs help, support, love and understanding - not judgement.

What I want you to know is that people with mental illnesses have families, they have people who care for them, advocate for them and are frightened for them.

I'm struggling a bit to keep my head above water.  I have diagnosed myself with "sad-sack-itis" - something I find myself dealing with when I'm dealing with too much other "stuff".  So the Ms Midge sewing has taken a bit of a back seat these past few weeks, and will probably unfortunately remain there for a little bit longer.  I haven't forgotten about my lovely customers!  I HAVE ordered some beautiful Autumn/Winter fabrics with the hopes of making lots of yummy warm outfits for your littlies!  And I will be listing them for custom orders in small quantities.  There will be no mass production lines or mini collections like I used to churn out!  I'm hoping you will stick around and see what I can produce!

A special BIG thank you to those of you who have ordered this past month and have been very patient and understanding.  I really do appreciate it!

Soooooo..........onwards and upwards!  I'm hoping that by sharing this little piece of me, it will help lift a bit of the burden I'm carrying, and lift the old sad-sack-itis far far away!

xxx


Wednesday, March 20, 2013

W.I.P. Wednesday #13

It's a bit of a sad state of affairs over here W.I.P. wise.....I feel like I've been doing lots of everything, but not getting much done!  And apart from the lovely quilted bag I told you about Monday, and a couple of little finishes I will show you on Friday, there's been almost NO quilting!?!?!?!  What the?

Anyway, here is my current pile of W.I.P.'s that are keeping me from the quilting business!  They are a bunch of gorgeous orders, using a variety of gorgeous fabrics.  So one can't really complain....


Some divine Japanese Lecien florals mixed with denim, the lovely chevron poplin for a couple of frocks and some really fun Japanese children's characters for my little God-daughter's kindy clothes!

I promise I will have more to show you all next week!

I'm linking up with Freshly Pieced!


WIP Wednesday at Freshly Pieced

Monday, March 18, 2013

A Bag From Numbers - Tutorial (of sorts!)

Whilst I was in Queensland last month, I had to pleasure of catching up with my Tokyo BFF, and her lovely family.  Lucky for me, her gorgeous little girl also just happens to be my God Daughter!  Anyway, at the end of our weekend, after she had handed over the MOTHER LOAD of fabric, she got out her notepad and pen and wrote a little list of things her little boy required for Kindergarten.
It's been living in my handbag pocket, and survived a near death experience via Chloe's pen.....

The last time I made bags for these gorgeous kiddies, I looked up tutorials, and it was actually quite time consuming trying to find a tutorial that had the same measurements etc that I was looking for.  This time, I thought I would dive straight in and just make it up as I went.  Given my lack of mathematical ability, this could have turned out a disaster.  But I'm happy to say - it didn't!  Here's how I made a bag from numbers.......

I got my scrap piece of paper out and searched the house high and low for a pen.  Once found, I took the numbers from my little note and drew some very technical diagrams.  I basically worked out that I needed four sides to the bag, which are the two top drawings above, and then guesstimated how long the handles needed to be for a three year old to carry. I also needed a bottom for the bag, which I initially was going to cut another "pattern" piece, the bottom diagram.  But I sacked that idea and just went with a longer single piece of fabric, which was made up of the two main pieces and the bottom piece.  Are you still with me???

I picked out this gorgeous Japanese train print!
And these are all the pieces cut out ready to go.  Main piece 15.5 inches wide x 26.5 inches long.  The sides were 11.5inches x 3.5 inches (two).  And the handles were 11.5inches x 4inches (two).  I cut two strips of heavy iron on interfacing, 1inch wide.  And also replicated all of the pattern pieces in a navy blue poplin for lining.

I took the fabric for the handles, ironed them in half lengthways, and then folded the sides in to the middle and ironed again, making them into a large sized binding.

Popped the strip of interfacing in and ironed it on, to give it some added strength.  Then ran four lines of stitching through it to give it more strength and stability.

I was going to use batting for the main section (as my friend said these particular bags are usually quilted - who was I to argue?), however found some fusible wadding.  Fab.  Cut a piece of the same width and length and ironed that baby on!

I then found a lovely scrap piece of homespun and made myself a quilt sandwich, and used some basting pins to keep it all secure.
Then got my free motion quilting on!  I love this, so much fun just whizzing around!

Once I had the quilting sorted, I then needed to work out how on earth I would put it all together.  Possibly something I should have done earlier?  I decided to measure half way on the length, and pinned it, then took the side pieces (which I failed to note also have some heavy weight interfacing ironed on, and then ran a few rows of stitching through them) and at their centre mark, matched it up with the pin marking the centre of the quilted piece.  I secured the sections together about 1/4" in.

I then brought the sides of the bag up flush with the length of the side piece, and pinned them together.


Right on the corners, I just squished them flat, and stitched from one end through to the other.

And then repeated it on the other three lengths.

This is how the sides of the bag ended up looking.
I measured the centre top of the bag to work out where to place the handles.  Got out my trusty quilting ruler and spaced them four inches apart.  Then stitched them on.  A bit of backstitching was required here.

And this is what it looked like! Don't mind the mighty overhang prior to trimming the side pieces!

And I was happy when I turned it right side out and it looked like a bag!

Time for the lining!  I put the lining pieces together exactly the same way as the main bag.  Then with RIGHT SIDES TOGETHER, I popped the bag inside the lining and pinned it all together, matching the side seams, and making sure the handles are sitting between the lining and outer bag.


And sewed all the way around the top of the bag, only leaving a few inches, backstitching at both ends.
Like so!

Time to wrestle!  Anyone who has ever turned a bag or anything out the right way will tell you that there will be a few moments of doubt, when you wonder if you will actually succeed in pulling it all out without ripping it to pieces?  It's a game of slowly, slowly.  And I promise it will end well.....

And you will exhale when you end up with this!
Push the lining inside the bag and finger press (ok, it took me a while to figure out what that meant - use your fingers like an iron!) the layers together, so your seams match beautifully and pin them.  Then sew all around the top edge of the bag, making sure the opening you used for your wrestling is tucked in nicely.

And BAM!  You have a bag!

Phew.  I hope this makes some resemblance of sense and that you have learnt even the tiniest bit from it?  I know I did, hence why I wanted to try and share!  The moral to this story is - anything can be made from next to nothing - even when all you have is numbers!
And just in case you were wondering - here are the other two requested bags!  The Japanese teachers requested thick cord so they can teach the kids how to tie bows!  Great idea!
I'm linking up today with

Plum and June

Being hosted by the lovely Jamie Lee over at Busy Bee Quilts!

Sunday, March 17, 2013

Sunday Stash #9 - Accidental On Purpose Purchases.....

A couple of weeks ago, I heard on the grapevine fabric junkie line that Spotlight would be having a 30% off all fabric sale on the 12th and 13th of March.  Being the fabric geek I am, and knowing that I needed required wanted a few things, I put an alarm in my calendar, so as not to forget.  The timing was perfect, as I was working on the 12th and HAD to pop in there to get towels for a resident, so took my lunch break and made the most of it!

Lunch break at spotlight! 30% off
Got just a little bit carried away....
More Sarah Fielke #Onthepond
This was actually the one thing I really needed more of.  I'm in the midst of making a gorgeous quilt from the Sarah Fielke range, and didn't realise there were a few more prints in the range than what I got in the two fat quarter packs I had initially bought!  I chose the green leaf print for the backing.....I can't wait to get stuck back in to that quilt!
Mermaids for my little mermaid
Once I'd chosen what was needed, I accidentally started looking at all the other fabrics.  I sort of knocked the mermaid bolt off the shelf and it miraculously landed in my trolley.  Who was I to argue?  Chloe adores mermaids, so a metre was purchased with the intention of making something for her.....win, win.
Cute
When I was standing in the line for the register, the lovely American accented lady in front of me, with her three cute girls in tow, had these prints in her hot little hands.  After I'd had everything cut and folded for me, I spotted these bolts on the desk and said I best get me 25cm of each......whoops.
News print
After the knocking the bolt off the table in to the trolley debarcle, I couldn't help but notice this news print shouting at me.  50cm was promptly purchased.  For what purpose, I have no idea......
Beloved
I did actually choose this print on purpose.  Strange I know.  I've used it for the backing of the cushion I made for a gorgeous teenage girl.  I think the words are powerful.
Poplin chevron!
I had to go through the dress fabrics on my way to the registers.  Well, sort of.  Bit of a detour really, which led me to these.  Chevron + poplin = LOVE.  That was the end of my Spotlight journey.  Oh, except for some other little bits and pieces, but no more fabric.
Thanks Ikea
And then, just when I thought I had accidentally on purpose acquired enough fabric for one week, I was called upon by some friends who have just moved from the UK to Melbourne, to help them out.  I had the joy of looking after their 17 month old cutie whilst they bought a house full of white goods!  Unfortunately amazingly it was at the Homemaker Centre, which also houses Ikea.  Danger, danger!  I left them somewhere in the living room section and made my way to fabrics.  Looking at my watch, I knew I had approximately seven minutes to find fabric, cut said fabric, find an Ikea employee to weigh and tag it and get to the register in time to check out and get to kindergarten pick up on time!  It was tight, and I DID run through the maze that Ikea is, and got to Kinda with a minute to spare!  AND I managed to get four metres of each of the above prints.  I'm thinking quilt backing?  $3.99 and $4.99 per metre!  BARGAIN and worth looking like a knob running in sandals!

Sooooo, it's time to re-shuffle those fabric shelves.  Again.

I'm linking up with Sunday Stash @ Finding Fifth!  Being hosted by the lovely Gemma over at Pretty Bobbins!  Go check it out!
Related Posts Plugin for WordPress, Blogger...