Saturday, July 12, 2014

Kate Spain Charm-Along - How U Doin???

It's been a whole week since the Kate Spain Charm-Along was launched!  Can you even believe?  I can.....it's been a week of pain in terms of not being able to get all the sewing I wanted to get done because of Ms Bernina's hissy fit.  I picked her up Thursday afternoon, got a few hours sewing done and then BAMM, she laid down again started snapping threads again!

Moving right along.....

My fellow charm-along'ers are doing a fabulous job with their charm squares!  So I thought I best whet your appetites.....

Riddle and {Whimsy} Spanish Chains top vertical

Jo from Riddle & Whimsy has well and truly put the foot down and FINISHED her quilt!  What???  How divine is it?


Keera from Live Love Sew has also been busy, with her quilt top complete.  I love all the white against the prints!  Keera has a tutorial coming for this very design.  Nice!


Jenny Doyle is one of the Aussie Charm Swappers, and I am loving her use of the Drunkard's Path blocks.


Luisa is another swapper and is doing a superb job with these twister blocks!  Imagine all the cutting!


And Tina - yep, my swappers are on fire - has made a few items, including this beautiful cushion cover.


And last but certainly not least - Quilt Jane has done it again!  I have a serious quilt crush on everything Jane does, and this one is no exception!  Swoon!

I'm so utterly impressed with everyone's enthusiasm!  If this is the first you've heard of the Charm-along, then you best go READ THIS POST for full details!  There are SEVEN amazing prizes up for grabs from wonderful Australian sponsors AND Kate herself!  Go!


Ms Midge

So - are your charming along with us?  How are you going?  Tell me!
xxx

Tuesday, July 8, 2014

Making It Work - A Lesson In Patience

I've been channelling Tim Gunn this past few days (Project Runway for those of you scratching your head), and have babbled "make it work" on more than a few occasions.  You see, my darling Bernina came very close to being thrown through my wall on Friday, after repeatedly snapping threads and just being an all round biatch of a machine.  After the 542nd thread snap, I snapped.  And turned to my IG friends, asking for advice......  Which lead to Gemma texting me instructions to do this......


Well that was terrifying!  Thanks for that little lesson @prettybobbins 

After holding my breath for a while, I managed to gently dust the machinery and dislodge a little thread in the uptake thingamajig, then put it back together again.......  It worked for a whole five minutes then 
SNAP!!!!

I called the dealer I bought her from (in Tasmania) and walked through some trouble shooting, and she gave me the bad news that I'd need to take her somewhere to be looked at.  Thinking tension discs or a burr on the bobbin case.  Sigh......

Anyway, I picked up my bottom lip and rang my Mum.  Drove around there and picked up this......

So after a call to my Bernina dealer in tassie.....ive booked my baby in for a service and just picked up this one from my mum.  Shattered but grateful! 

Good old faithful!  I used this for quite some time before buying my own Bernina, and it's an absolute work horse.  HOWEVER....  it has no quilting extension table thingy, nor a walking foot, nor a zipper foot.  Hence, I have had to make it work.

Trying to make fmq work with my mums old bernina. #imissmymachine #todolistssuck 

My to do list this week is literally packed.  And I was so depressed about my missing baby, I couldn't bring myself to sew.  Kicked myself up the bum this morning and got out my big extension table and just sort of sat it there.  Worked out how to drop the feed dogs and whacked on the fmq foot and just gave it a crack.

M is for Mitchell 

And ta-daaaaa!  Look, it's far from perfect, but given there's no needle down function, the fmq foot is not actually genuinely made for this machine and the dodgy way I had the extension table set up - it's pretty damn good!  I had this cushion cover top finished a few days ago - it's a birthday gift for one of my youngest daughter's friends.  M is for Mitchell!  I pulled out a bag of scraps leftover from my SON's QUILT, which I knew eventually would come in handy!  The letter M is from Quietplay's alphabet patterns, and is super easy.

M is for Mitchell 

I literally started in the middle of the cushion and worked my way outwards.  There's some wonk in those "organic" straight lines!  But I am actually very impressed with the consistent stitch length - that's one tick!  I used my go to thread - Aurifil #2024.

M is for Mitchell

Once I got the the white space, I tried a little pattern I've seen around, and just love it!  I can see myself using it on a bigger scale on quilts.

I'm not even showing you the back!  Let's just say that inserting a zipper without a zipper foot is not my forte!  But hey - six year old boys are not likely to criticise?  I hope?

All in all, it has been a very interesting experience.  I have learnt patience in my quilting.  After I'd finished this cushion, I kept going and finished off two other cushion cover tops for Collaborate For A Cause.  And the quilting is actually incredibly neat and as I said before, the stitch length is perfect.  So there's a lot to be said for quilting with anxiety!  I am however looking forward to a phone call from the service guy telling me I can pick up my baby!

I'm linking up - You can too!


Sew Cute Tuesday


Sunday, July 6, 2014

The Kate Spain Charm-Along

Now that the Kate Spain Aussie Charm Swap has wrapped up, I had to find something else to do with my time!  So I've managed to round up some fabulous Australian sponsors with some fabulous prizes - and have created the Kate Spain Charm Along!

WHAT?!?!?  I hear you say....

Well, I want you to go forth with your Kate Spain charms and CREATE!  It does not have to be a quilt, it can be whatever your little heart desires, or whatever your charm squares tell you they need to be - BUT they have to be Kate Spain charms!

Do I have to be an Aussie Charm Swapper to be involved?

NO!!!  This Charm Along is open to EVERYONE around the world - BUT you have to be using Kate Spain charms and you have to agree that if you win one of the lovely prizes and you live outside of Australia,  you will pay for shipping, direct to the sponsor.

So - how is this going to work?

Go and find all your Kate Spain fabric and turn it in to charm square heaven.  Then turn those charm squares in to something you truly love!  You will have FOUR weeks from today, and I will then open up a big old linky for you to join in and show me your projects!  The linky will open on Sunday the 3rd of August and will close on Tuesday the 5th of August.

What's in it for you?

$50 Gift Voucher.jpg
A $50 Voucher OR a Kate Spain Solstice Jelly Roll from fabricgarden.com.au
10529642_10152970726748082_1016553637_n
Mystery Bundle from Gnomeangel.com

patternsonly
$20 Voucher to spend at Patternsonly.com

kate
FQ bundle of Daisies 'n such from katequilts.com
kelliottmagic.com.au
12 FQ Solids bundle from kelliottmagic.com

MerlyLou Designs Spring Cushion Pattern & Woollen Felt Kit

AND....... Drum Roll..........

horizon


A very special prize for one of the Aussie Charm Swappers - from Kate Spain herself!  Horizon charm pack, Kate Spain Journal and Playing Cards!

If you are looking for some Pinspiration - my fellow charm swappers and I have a fabulous Pinterest board - Charm Square Love.

So - who's joining in?  What are you waiting for?  Grab a button and GO!

Ms Midge

Wednesday, July 2, 2014

Schnitzel & Boo Mini Quilt Swap

A couple of months ago, I signed up to join in the fun of Schnitzel & Boo's Mini Quilt Swap!  It was one of those - I have no idea what I'm doing but it sounds good - kind of deals.  Once I wrapped my head around what it involved, I knew exactly which mini quilt I wanted to make, and waited for instructions about my partner who I'd be making it for!

I was hoping to get a social media hog like myself, so I would be able to stalk his/her accounts in all forms, but alas, I only had one social media site to stalk, and even then - did not get much to go on!  The only clues I got was via my information email which stated they liked amongst other things "muted colours" and a handful of designers, including Tula Pink.  With that little snippet of insight on hand, I raided my stash.  I completely forgot I had a bundle of Acacia hidden amongst the shelves, so that was a little jackpot in itself!  This was as "muted" as my colour palette gets.  And the rest, as they say, is now history.....

Schnitzel & Boo Mini Quilt Swap 

The pattern I planned to use was perfect!  Quilt Jane's Nested Churndash is an awesome pattern, and is so super duper easy it's not even funny!  You can buy it HERE!

Schnitzel & Boo Mini Quilt Swap 

I wanted the perfect little fussy cut for the centre block, so ripped open my Foxfield charm packs and found this little bunny!  Fabulous!  And even better, both fabric lines go perfectly together!  Winning!

Schnitzel & Boo Mini Quilt Swap 

My partner also likes Low Volume prints, bonus.

Schnitzel & Boo Mini Quilt Swap 

A little Tula Prince Charming for the back, and I was done!

Schnitzel & Boo Mini Quilt Swap 

I chose a fairly simple quilting pattern - just some straight lines going around in "circles" from the centre.  I used a variegated 40wt Aurifil thread - grey #4670.

Dear swap partner. .... I am NOT a hand sewing pro! But I just did my first ever blanket stitch...... and whilst it's far from perfect and took me forever, it was done with love! This will be on its way tomorrow!  #schnitzelandboominiquiltswap #makeaquilt

And in breaking news - I HAND SEWED A QUILT LABEL ON!!!!  Yes, I had to google how to do a blanket stitch by hand.  And yes, I had to continually watch the You Tube video as I sewed.  And no, it's not perfect!  BUT - I was quite chuffed and proud of myself.....

A bit of sustenance for my partner!  #schnitzelandboominiquiltswap #makeaquiltmakeafriend on its way now!

And on Monday, these yummy little treats were wrapped up with the little mini and sent far far away across the sea!  I am hoping and praying that my partner likes what I have done, and likes the Aussie treats I've included.

Now - on to the other exciting part of this swap.....

My Received Gift from Tara 

Yesterday, a package of amazing-ness was delivered to my doorstep!!!!  After I finished hyperventilating and Instagramming my excitement, I took a photo for you all!  My fabulous secret partner was Tara in Brisbane.  Now Tara has gone way beyond any of my expectations and packed a box FULL of everything quintessentially ME.  Either I sent my personal information way too in depth to the organisers, or Tara has successfully managed to stalk all of my social media and find out everything I love in life?  I'm guessing the second is more correct.....

My Received Gift from Tara 

A mini Swoon quilt made with Anna maria Horner prints - I die.  Uh-mazing Valori Wells fat quarters - I die again.  Mint Lindt......Stopped breathing.  AND a freakin tea cup and tea - I'm gone.  Seriously - SOOOO generous and SOOOOO nailed it.

My Received Gift from Tara

Oh, and can't leave the back out of the limelight!  I need to get to Bunnings for some dowel - as I've found THE perfect little spot on my wall!

I feel so completely overwhelmed with Tara's generosity, and so thankful that once again, the handmade community has shown just how wonderful it is!  So - next time you see a sign up for a swap you might like to join - DO IT!  You may just make a new friend - or 10!


schniztel & boo Mini Quilt Swap, round 1

Tuesday, July 1, 2014

Quilted Placemat Tutorial

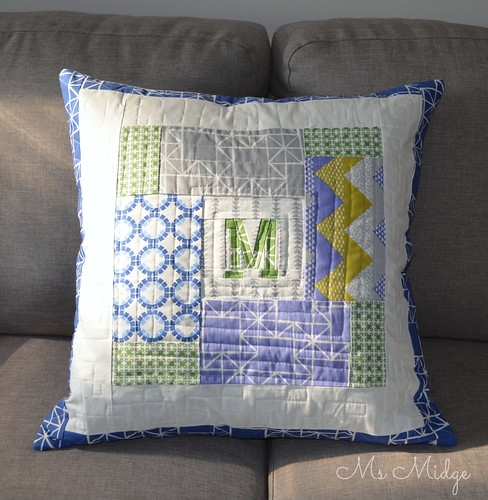
Do you have special little people in your life - you know, the ones that you've basically made almost everything under the sun for?  So that when it comes around to their birthday, you're left wondering what on earth to make?  Well, that's where I found myself this week!  My youngest God-daughter lives in Tokyo, and she has a multitude of handmade goodies, including cushions, wall hangings and clothing!  I have a quilt in mind to make for her when she moves in to her big girl's bed, but the postage to Tokyo is a killer, so I'm hoping to get it done for Christmas, and hoping even more to make it over there to hand deliver it - but that's a whole other blog post!

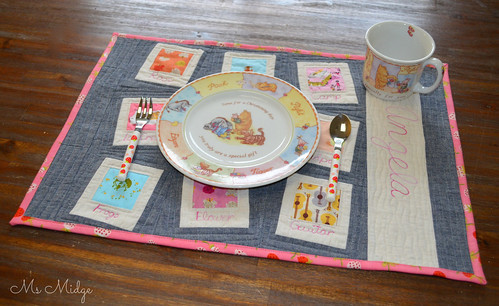
Soooooo........yesterday I decided I would make a personalised placemat for her.  Ummmm, how?  I threw some questions to my homegals/guy over in QCA, and they gave me the encouragement to go forth with my idea.  So I did.  

Quilted Heather Ross Placemat

I was so excited to get out my Heather Ross stash, and knew it would be super special, so thought I would take some photos in case I could make a tutorial from it.  And well, what do you know - here's a tutorial!

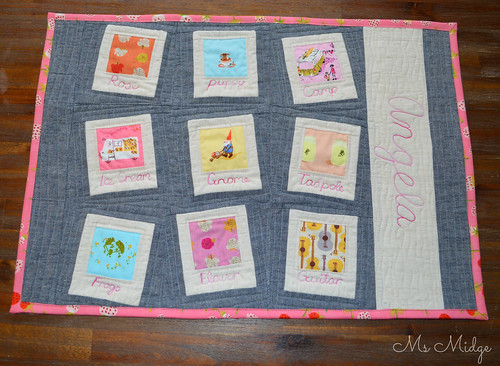
WONKY POLAROID QUILTED PLACEMAT

DSC_0363

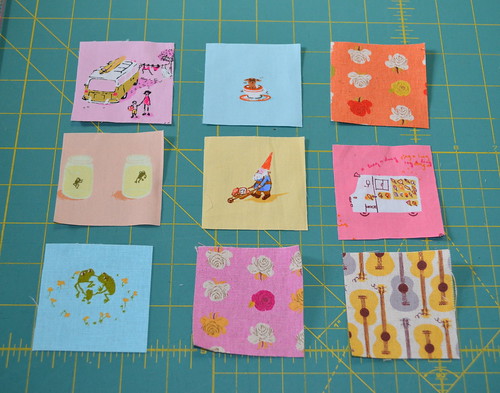
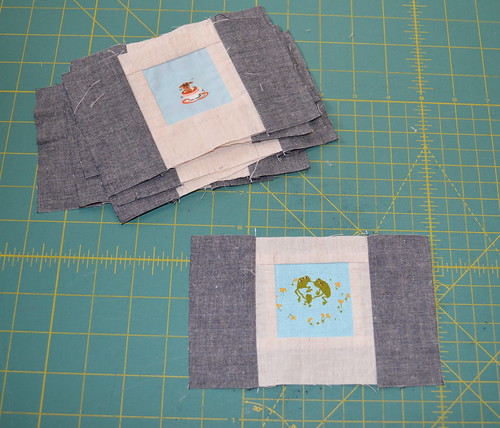
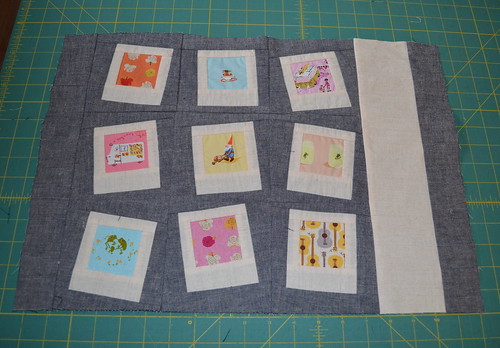
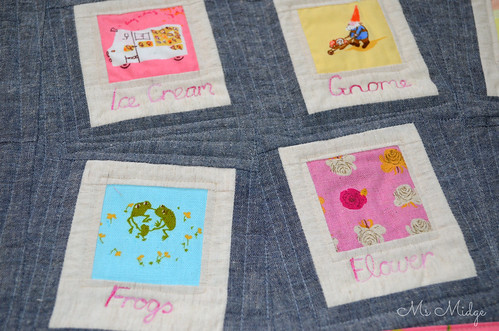
Find yourself nine fussy cut prints, and cut out 2.5" squares.

DSC_0364

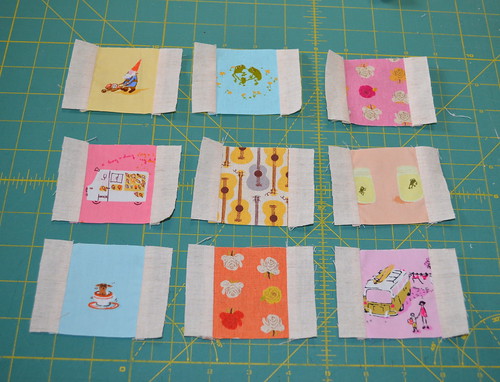
Cut out your side pieces at 1" x 2.5".  You will need 18 of these.  I have used a natural looking linen - sort of gives it an aged polaroid look!  Sew them on with a 1/4" seam allowance and press.

DSC_0366

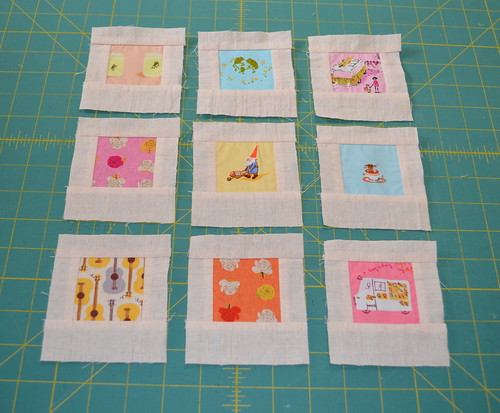
Next up, cut nine strips for the top at 1" x 3.5".  And nine strips for the bottom at 1.5" x 3.5".  Sew them on and press again.  You will then have your little polaroid rectangles.

DSC_0367

You now need a darker fabric for the framing of the polaroids.  I have used a blue/charcoal linen.  Cut out 18 strips at 2"x1.5" and sew on to the sides and press.

DSC_0369

And 18 strips of 2"x7" for the top and bottom.  Sew on and press.  You will now have nine finished polaroid blocks.

DSC_0370

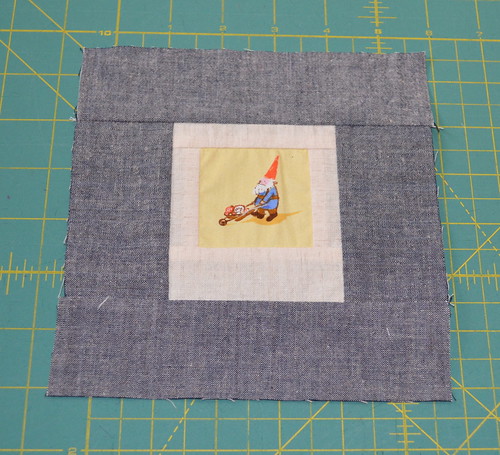
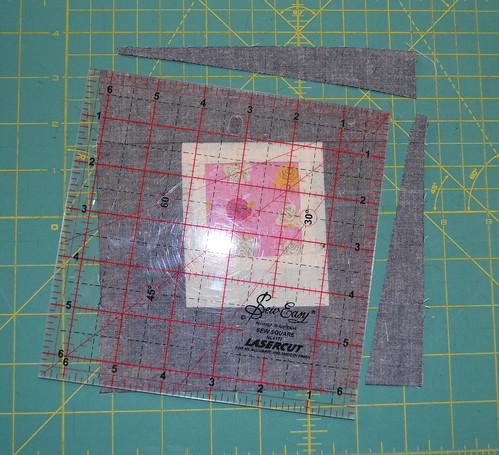
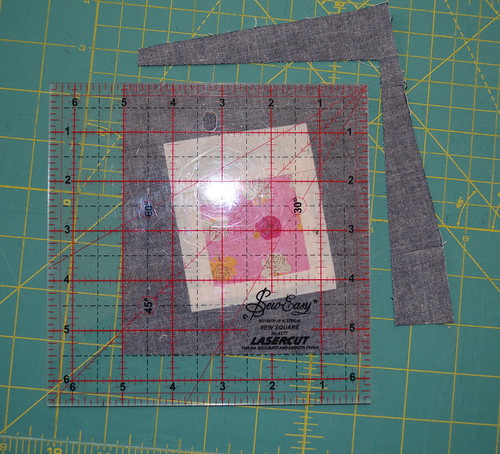
To make your blocks wonky, place your ruler (a square one is perfect) over the top of the block and then turn to one side as above.  You want your wonky block to finish at 5" square, so when lining the ruler up, make sure you have at least 3/4" away from the polaroid on each of the sides.  Trim.

DSC_0371

Then turn your block around and square it up with your ruler again.  (Take no notice of the fact that I have it lined up at 5.5" above!!!!!!  It should be 5"!).  Trim again.

DSC_0372

Alter the direction you turn your ruler, so your blocks are all kinds of wonky!  Sew these nine blocks together.

DSC_0373

You can then begin to add strips of fabric for personalising.  I chose to add a 2" strip to the left hand side, and then a cream strips 3.5" to the right, followed by another 1.5" strip of dark.

DSC_0374

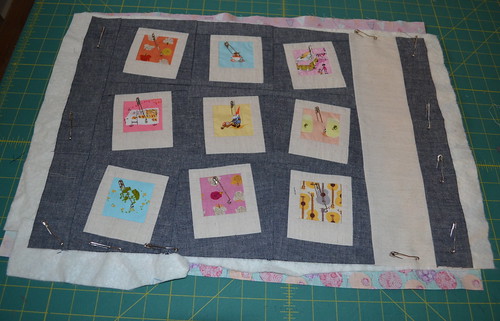
Make yourself a quilt sandwich and baste ready for quilting.  And yes - I do have a batting jigsaw puzzle down there on the bottom!  Use up scraps of your batting - you don't have to sew it together, just pin it down and the quilting will sort it out.

DSC_0375

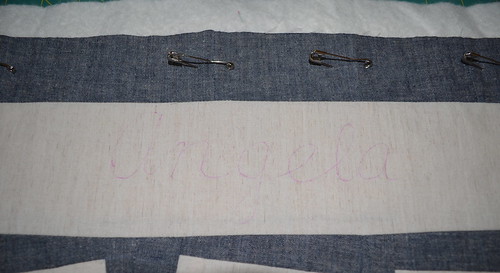
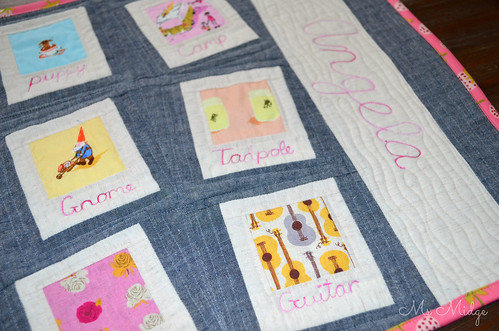
When doing large lettering on items, I sometimes use an erasable marker for an outline to follow.  I know lots of clever quilting peeps who like to hand embroider, but you all know me by now yes?  So it's free motion quilted lettering here!

Quilted Heather Ross Placemat

I chose a variegated Aurifil 40wt - Pink Taffy - for the words.  I love how it looks!  All of the little words under the polaroids are completely free handed.  Hence, they are not perfectly centred.  But it looks more like they have been written on.  I also used a 50wt #2000, which is a beautiful cream/gold thread, for the outline of the fussy cut and the wavey lines through the cream linen.

Quilted Heather Ross Placemat

It was suggested to me that placemats need to be quilted quite densely in order for them to sit flat enough.  I chose #2610 Silver/grey and started outlining the blocks, and just kept going and going until I was certain there were enough to give it stability.  I LOVE the end result!

Quilted Heather Ross Placemat

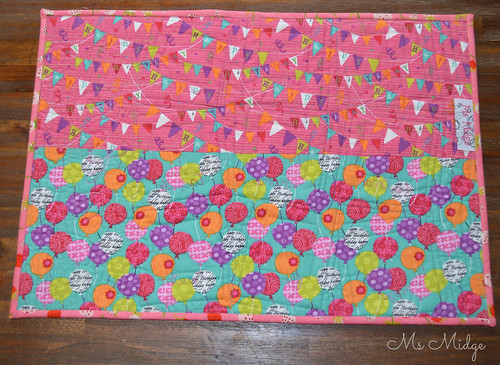
A couple of cute birthday prints on the back making it perfect to flip over for birthday celebrations!  I completed it with a Briar Rose print for the binding.

Quilted Heather Ross Placemat

I'm pretty damn chuffed with the end result!  The finished size is 19.5" x 13.5".  As you can see - a great size for a little one.

I've used a cotton batting, you could add insulbrite if you were wanting to make them a little more heat resistant, however, for a three year old, I thought the odds of her having a burning hot meal were pretty low :)

So there you have it - a quick and easy gift!  This took me a few hours to whip up!

I'm linking up - You can too!


Sew Cute Tuesday
Related Posts Plugin for WordPress, Blogger...