
We're up to day THREE of the Cushion for Christmas Blog Hop! Make sure you head over to Kristy @ Quiet Play for her fabulous cushions today! And she also has a super giveaway!!!
Now, on to my latest creation for the hop. The questions I am most commonly asked are: "How do you put a zipper in a cushion back" and "How do you machine bind", so today, I'm going to show you how I put my zippers in, and I'll be back next week with the machine binding tutorial!
Take a deep breath, grab a cuppa - there's lots of photos in this tutorial!
First of all, I start off with a pattern, or in this case, some leftover blocks from a quilt…

I had four leftover blocks from my Honey Honey Framed quilt, so I pieced them all together and popped a white border around it to bring it up to size. You can use this same theory with any blocks you have lying around! Next time you're at your local fabric/supplies store, check out their cushion inserts, and take note of the sizes they stock. Generally speaking, I'll make my cushions 18" or 20", but you can work with whatever you've got.
Next step is getting some batting. Now, a great thing to know is that you don't always have to have one whole piece of batting. You CAN piece smaller offcuts of batting together - especially handy to know with small projects like this. I piece my batting as follows…..

Get yourself a couple of pieces of offcuts, put them together, with an overlay of about half an inch, then set your machine stitch to the widest zig zag stitch.

And bingo! You now have a piece big enough for your cushion.

Then the fun begins! Make yourself a quilt sandwich - Your cushion top, batting in the middle and then a great part of the cushion quilt is that you can use just a plain homespun or even calico as your backing - because nobody will see it! Baste it together and decide on your quilting design.

This size project allows you to really use your imagination, and tackle free motion quilting designs that you may find daunting or tricky to use on a big quilt. This is one such design. I wanted to use this big petal/flower design for my Honey Honey quilt, but the twisting and turning of the quilt did my head in, so I abandoned it. I LOVE how it turned out on this smaller scale. And of course, I used my favourite thread - Aurifil #2810.
Use your quilted cushion covers as a practicing ground! Go crazy!

Trim your cushion cover down to size.

Choose a backing fabric, and then cut out a piece about an inch wider than your block and approximately four inches longer.

Cut your backing straight through the middle.

Then overlock (serge) or neatly finish the edges.

Grab yourself a zipper that is at least as long as the width of your backing. If you have a longer one - that's fine!!

Now, place your zipper facing down on the right side of your fabric. Line up the edge of the zip with the finished edge of the fabric, pin it in place.

As shown here.

Put your zipper foot on your machine (you CAN use a regular foot, but these ones make it easier).

Set your needle as far to the left as it goes. (Don't forget this step or you will end up with a broken needle. Don't know how I know this…..)

Line the side of your foot up next to the actual zip. You will be able to feel the plastic/metal of the zip with your finger. Now sew! Take it slowly and ensure the edge of the zip stays on the edge of the fabric.

One side done!

Press your fabric down nice and neatly.

Move your needle over to the far right now and topstitch just a tiny bit away from the zip.

As seen above.

Now place your zippered backing half and place it right sides facing on to the other backing half. Lining up the sides of the backing as evenly as you can.

Repeat the lining up of zip edge to fabric edge and pinning.

And sew again….

And you will have put your zip in!! But wait…..there's more!

Take your zippered backing over to the ironing board, and press the second side nice and neatly (DON'T TOPSTITCH!) You now want to pinch your fabric, about one inch down, and fold it up over your zipper.

Measure it on both sides so it's even.

Then press it.

Pin it down on the folded edge.

Move your needle to the far left. And slowly sew down beside your zip.

So it looks like this!

And you now have an enclosed and covered zip!
You still with me???? Exhausting isn't it?? Grab yourself a drink…..
Now it's time to put your cushion cover together……

Lay your backing down, right side facing down.

Place your cushion front on top of the backing. Try and get it as straight as possible, so that the zipper is the same measurement from the top of your cover on both sides.

Pull your zipper back a few inches from the edge.

And pin the zipper edges nice and close together.

Trim your backing to the same size as your front. You can literally cut straight over the zip! Baste it all together, and then sew around the edges about a 1/4" in.


You now have a cushion cover. Just needs binding! If you know how to bind a quilt, then you will be able to bind a cushion cover! I will be back next Tuesday to show you my version of machine binding.
Most important of all, find yourself a cushion insert that looks like it will be just a touch too big for the cover! Cushion inserts lose their "oomph" after a bit of living, so you want to make sure it will be able to last the distance...
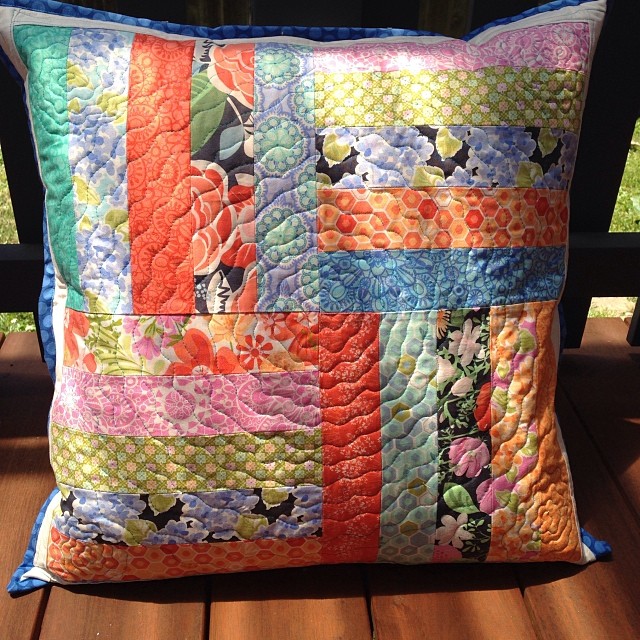
Isn't she beautiful?? This cushion is the perfect example of using fabric and/or blocks that you have lying around (I mean literally, these blocks lay in the corner of my lounge room after trimming the quilt!) to make something exquisite, that will make someone really, really happy!

And the back. I am super happy to tell you that this beautiful cushion cover has been sold to one of my customers. Win, win!
Tomorrow you will be hopping over to see Joshua at Molli Sparkles! I can't wait to see his first ever cushion creation! Be sure to check out my original hop post HERE with the full schedule and all the details about the fabulous prizes up for grabs!
Have you started your Cushion for Christmas yet?

This pillow cover is lovely...I would love to make one if time allows...thanks for the tutorial!
ReplyDeletelove this tutorial for the covered zipper! and of course, now I'm kicking myself for not jumping on the Cushion for Christmas party (although I'm keeping up with all of the awesomeness from the sidelines)! I have actually managed to get a couple of pillows done ahead of schedule. such a cute quilting design in this one too!
ReplyDelete:) Kelly @ My Quilt Infatuation
Love it!! your tutorial on the zipper was wonderful....and I love the quilting
ReplyDeleteGreat cushion, great tutorial! Thanks.
ReplyDeletelovely, and thanks for the great tutorial. I have made 3 blocks out of 4 for my cushion, but have run out of fabric, so am desperately searching though my stash for something that will work!!
ReplyDeleteGreat tutorial - hadn't though to cover the zip over like that - very clever!
ReplyDeleteGreat tutorial, I have recently discovered how easy it actually is to sew in zippers, have been zipping almost everything, lol!
ReplyDeleteLooks amazing. I still don't get if your zip is bigger that it doesn't matter. Does the end just go into the stitching? Thanks for the comprehensive tute.
ReplyDeleteOh My Gosh! I love the pillow ~ thanks so much for that great tutorial!
ReplyDeleteI have never been brave (or bothered) enough for zippers (I'm terrible at pushing myself to learn new things!) But this motivates me to try! Thanks for making it look so easy!
ReplyDeleteI sew the zipper exactly the same way. Now I now how to call it, lol. I have never bind any cushion so I want to try that for sure.
ReplyDeleteNice and tidy to cover the zip!! Thanks for the tute!!
ReplyDeleteGreat tutorial, especially how you did the flap over the zipper! Very helpful, I am really keen to join in and link up a cushion for the blog hop so I'm going to do some serious stitching this week :)
ReplyDeleteThis comment has been removed by the author.
ReplyDeleteIt`s absolutely beautiful.I`ve tried the flap over the zipper and love it.I`ve never bind cushion and I`ve to try it.Great tuto!!
ReplyDeleteThe quilting design is stunning! Wonderful pillow. Thanks you for the tutorial on the covered zipper.
ReplyDeleteI would love to pin your pillow so I can have a reminder of coming back to your tutorial. I want to make sure this is okay with you.
ReplyDeleteGreat tutorial and THANKS!!!! You have solved the problem of what to give my mom for Christmas!!! :)
ReplyDeleteVery nice pillow cover! I love using my leftover quilt fabrics to make pillow covers to match. I usually just use an envelope closure on the back, but your zipper tute looks great, you make it look easy enough to try. And it gives a tidier looking finish too. I think I'll be upgrading to zip closures from now on :)
ReplyDeleteVery nice! Thanks for sharing a great tutorial.
ReplyDeleteThis comment has been removed by the author.
ReplyDeleteYou know, I never thought of making a quilted pillow, silly me. Love the tutorial and plan to work on that this weekend (or maybe one of these evenings if I get home early enough). Maybe I can get it done in time to link to the Cushions for Christmas Blog!
ReplyDeleteTeri Gail -- www.thecosmicquilter.com
What a clever way to enclose the zip...never thought to do it that way! Genius!
ReplyDeleteThank you for a very useful tutorial. I'm going to try it out today!
ReplyDeleteLove the cushion, and thanks for showing me how to the back and zip. It's something I haven't tried before so it's always good to get new ideas.
ReplyDeleteI love the free motion design you did on this piece - it is really pretty.
ReplyDeleteThank you so much for the tut! I never ever would have thought that a designer pillow would be so easy.
ReplyDeleteI am in the process of making my first cushion so a thought I would see if you had any tips and I find an entire start to finish tutorial! I'm off to get that drink and work my way through it now :)
ReplyDeleteThanks for the enclosed zipper tutorial - clear and easy to follow. I used the tutorial to make some cushions at Christmas. This just might become my favoured way to make cushion closures. Here's the post I wrote, linking back to your tutorial...
ReplyDeletehttp://www.threadingmyway.com/2015/01/cushion-covers.html
Gosh I love this tutorial. I use it EVERY TIME I make a cushion. Thanks xx
ReplyDelete