I hope you're enjoying the Cushion For Christmas Blog Hop!
Today is day 10 and if you head over to
On The Windy Side, you will find Adrienne's fabulous quilted Christmas Cushion!
Now - today I have another tutorial for you - How I machine bind….
I use this same method for my quilts, for many reasons, but mostly because A. I don't hand sew AND B. I don't hand sew…..
When it came time to bind my first ever real quilt, I searched the web for machine binding tutorials. My friend Gemma also directed me to Red Pepper Quilts, where Rita had
shared her technique. So I started with that and then figured out I could never catch the binding on the back perfectly, so altered things a little to suit me.
First of all, measure up and make your binding. I usually work with a 2.5" wide binding for cushions, but you can really make it as wide as you like. There's a fantastic app by Robert Kaufman called Quilting Calculator.
HERE is a review of it. I swear by it!
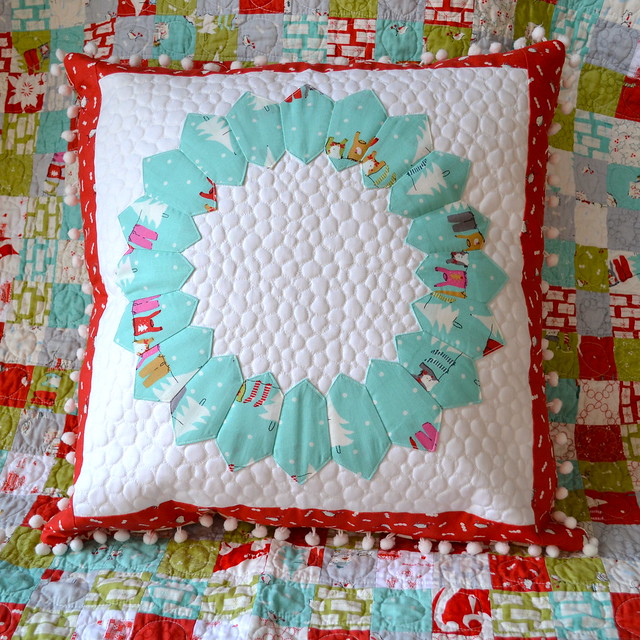
The delightful cushion I am sharing with you to illustrate said binding, is a paper pieced cover.

I used a pattern designed by
Kristy @ Quiet Play. You can find it
HERE with all her other fabulous patterns. If you're only new to paper piecing, it's a great pattern to try. Also great for using up scraps. I pulled out the scrap bag from my Swoon quilt.
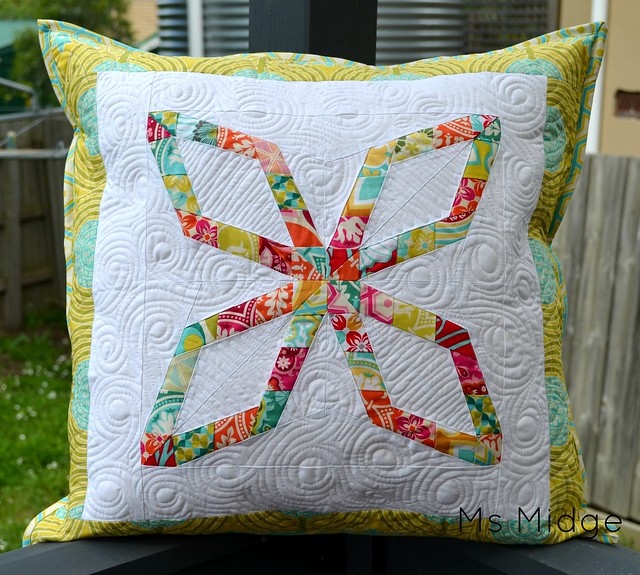
As I mentioned on my Honey Honey
Orphan Blocks Cushion, cushion covers are the perfect place to work on your free motion quilting! So go for your life! For this, I used a slightly different swirly pattern, sort of with an "eye" in the middle. I love it! I also just did some squiggles through the inside of the paper piecing. I used my favourite and most used Aurifil #2024. I now use it for all my piecing and garment making too.
Now, on to how I bind…
 |
| Once I've put my cushion cover together, sewing just shy of 1/4" around the outside, I work out how much binding I will need and get cracking….. |
 |
| I then start sewing the binding on, 1/4" from the edge, on the BACK of my cushion/quilt. When I start, I leave around 5" unsewn - sort of like a tail. |
 |
| When I get close to the edge, I stop about 1/4" before the corner, backstitch a bit…. |
 |
| Then take it from the machine like so…. |
 |
| Now it's time to prepare for mitred corners. Take your binding and fold it back at an angle, making sure to line the bottom raw edge up straight with the edge of the cushion….. |
 |
| Then fold it back over on to of itself…. |
 |
| Making sure to line up the folded edge of the binding with the edge of the cushion you have already sewn…. |
 |
| Place your cover back in the machine, and start sewing about 1/4" from the edge, backstitching a little, then continue sewing along the edge again. Repeat this at each corner you get to…. |
 |
| When you get to the end, leave another tail, so you have a gap and two tails like above. The wider the gap and longer the tails, the easier time you will have! |
 |
| Lie your binding tails down flat on your cover and make them meet like this. |
 |
| This will be where you join the binding, so you need to cut the tails off with about 1/4" - 1/2" for your seam. |
 |
| Flatten the binding ends out and sew your seam at the width you left. |
 |
| Your seam will look like this on the inside. You can see on mine there are two lines of stitching, that's because my guesstimate wasn't big enough to have my binding sitting flat enough! |
 |
| Fold your binding in half at the seam, and you should have a nice flat binding! |
 |
| Continue sewing the gap of binding together, and you will have one side done! |
 |
| Now here you will see there are two rows of stitching. The closest to the edge is the row from sewing the cover together, the second row is where I've attached the binding. You want to pull your binding over from the other side, so that it just covers that second row of stitching. |
 |
| Like this. Now I know a lot of people like to use pins or clover clasp things, but I find it easiest to just use my hands. I feel like I have more control! |
 |
| Now your aim is just stitch as close to the edge of the binding as you can. |
 |
| When you come to the corner, slow down and leave your needle down. |
 |
| Pull the fabric corner up from behind the cover. |
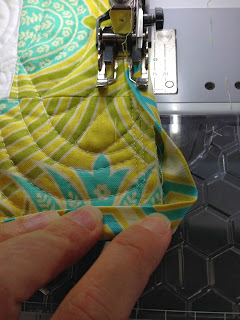 |
| Bring the bottom binding up and over your second row of stitching….. You will have a neat little fold in the side binding. |
 |
| And then bring the side binding up over the stitching so that the little fold meets up with the edge of the bottom binding, giving it its mitred finish. |
 |
| I then continue stitching down the binding as close to the edge, and hold my finger on the mitred edge as long as is physically possible before being squashed! When I get to the corner, I backstitch a couple, then leave my needle down, turn the cover, and continue stitching. I repeat these steps at every corner, and then I'm finished! |
 |
| Finished from the back! |
 |
| In theory, if you attach your binding this way, you "should" have a row of stitching on the back that is either very close to the ditch of the binding, or just on the binding. I personally use this way, because as I said earlier, I can't get the stitching perfect enough attaching the binding to the front first! And I'd rather some minor dodgy stitches on the back of my cushion/quilt than the front! |
 |
| And finished from the front! |
I still haven't decided who will be receiving this cushion for Christmas! I'll have to see how naughty or nice people have been….
If you're new here, or catching up, head over to my original Hop post
HERE for the complete schedule AND all the fabulous sponsors and prizes! There's only four more days until I open up the linky for you all to add your creations! Woot woot!


Very beautiful! I wish I can may one someday. :)
ReplyDeleteI love your Christmas pillow with the Pom poms!! I love me some Pom poms! Thanks for the machine stitching tut. I hand sew my backs but have always been curious to see how the 'machine binders' do it! Thanks for sharing that.
ReplyDeleteI totally agree with you on the machine binding. I have finished my last 3 quilts like this and although I enjoy hand binding, it is sooo much quicker to do it on the machine. Such a lovely cushion too.
ReplyDeleteFabulous tutorial! Never thought to "bind" a cushion cover like it was a quilt.
ReplyDeletevery pretty pillow and great tutorial
ReplyDeleteThese are both "sew" fantastic! It's amazing how much wonderful texture the quilting adds. I love it!
ReplyDeleteI agree with you on the machine binding. I finished my last quilt like this and it is so much faster. I like how it looks so much better on the front if you start binding on the back.
ReplyDeleteBoth pillows are so beautiful! Admittedly I have sewn once or twice the binding on the backside and folding it to the front to stitch it down. It does make for an easier way to make an appealing finish on the front. I do like how you fold the corners and are do more of a continuous stitching. There are several great ways to do binding and I have learned 2 new tips just this evening between your tutorial and from another tutorial on another blog site. Anyways your pillows are gorgeous with the marvelous quilting, design and fabric choices.
ReplyDeleteoops! I do like how you fold the corners that allow you to continue sewing to the end and around the corner. I hope that makes more sense?
Deletegreat tutorial, but I have to admit that hand stitching the binding is one of my favourite parts - I love seeing the quilt all coming together! Having said that - this is so much quicker and I am definitely likely to use it in the future! And I love love this cushion cover - makes me wish I had bought some Notting Hill fabric.
ReplyDeleteI machine bind everything these days too. I do from the front though. I stitch in the ditch right between the binding and the edge of the quilt, whilst rolling the binding to the back and holding it there. I catch most of it!
ReplyDeleteTake a look at artisitc Pillow Covers from Indianbeautifulart. Bring in sophistication and reliability in your living rooms. These pillow covers add a classic touch to your professional environment, be it office lounge or waiting room area.
ReplyDelete