Showing posts with label Blog Hop. Show all posts

Thursday, October 9, 2014

Going Plum Crazy

One thing I have found throughout this quilting world of ours, is how very giving quilty friends can be!  My lovely friend Laura from Quokka Quilts released her very own pattern last week - PLUM CRAZY - and on the same day, shared the news of my pattern release!  Now how nice is that?

So in the spirit of friendship, I'm sharing right back!  Laura's quilt pattern is a great fat quarter buster and if you check out some of her pattern testers quilt tops, you will see how gorgeous it can look in any array of fabrics.

Plum Crazy pattern by Quokka Quilts HERE


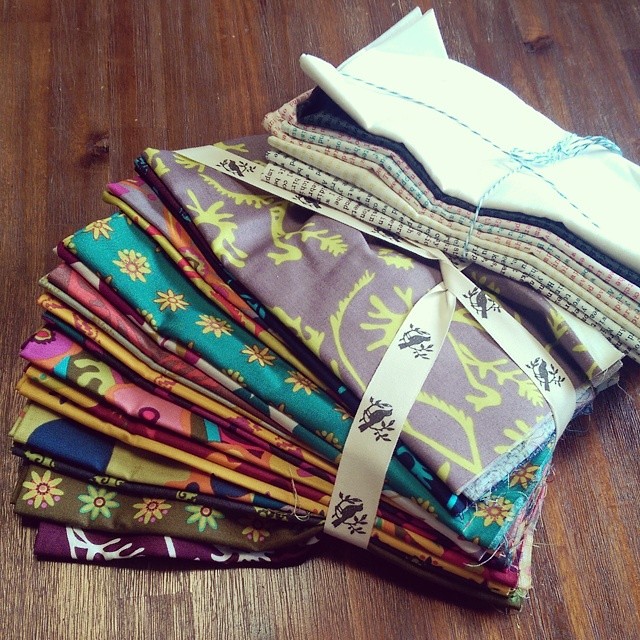
I think we shall name this week the #bestfabricdeliveryweekever this is my (first) #massdrop purchase! @alisonglass yummies!

I'm contemplating whipping one up using my bundle of Alison Glass prints.  Or you know, just flying by the seat of my pants and pulling an eclectic mix from my stash!  Laura is having a Plum Crazy Hop Along this week, you can check out everyone else's take on the pattern as shown below:
4/10 - Sara @ http://www.SewSweetness.com in Chicago
5/10 -  Serena @ http://Sewgiving.blogspot.com in Perth
6/10 - MR @ http://Quiltmatters.blogspot.com in Canada
7/10 - Teje @ http://nerospost.wordpress.com in Greece
8/10 - Vera @ http://negligentstyle.com in the Czech Republic
9/10 - Alyce @ http://www.blossomheartquilts.com in Japan
10/10 - Katy @ http://www.the-littlest-thistle.com in Scotland
Go check them all out!

Thursday, August 28, 2014

T.G.I.F.F. - Bijoux Metro Twist - Sew Kind Of Wonderful Blog Hop!

I have the pleasure of hosting T.G.I.F.F. today!  And do I have a finish for you....

QCRbloghopbutton

 When Laura from Quokka Quilts asked if I'd like to take part in the Sew Kind Of Wonderful Blog Hop, I said I'd love to, but would probably only manage a few blocks.  Fail.  The Quick Curve Ruler had me at Hello.  The lovely Jenny generously sent me a couple of patterns to choose from, and I was instantly drawn to the Metro Twist.  Firstly - it looked like the easier of the two, and secondly - it looked like the easier of the two!

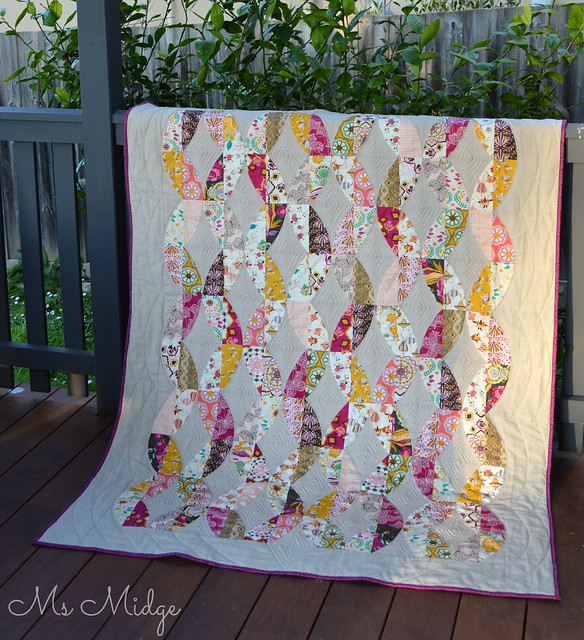
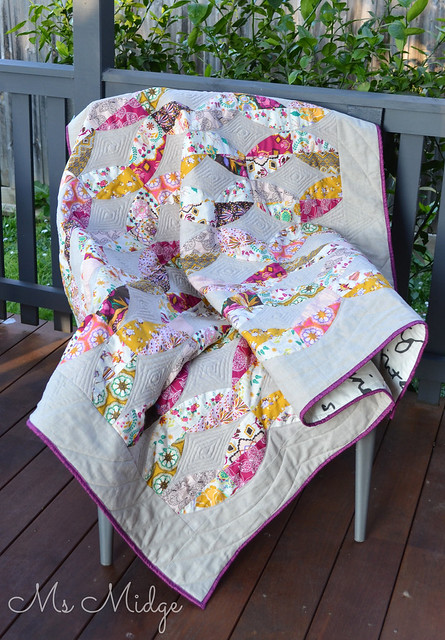
Anyway, needless to say - I finished the whole quilt....

Metro Twist

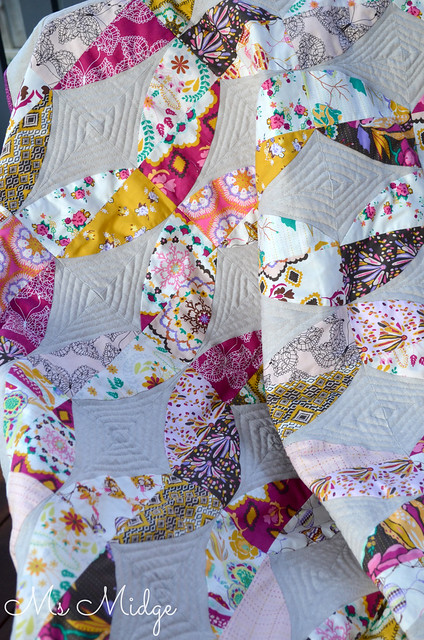
I felt the pattern leading me towards rich, yummy fabrics.  I had been holding on to Bari J's Bijoux for what seems like forever, and promptly de-shelved them for the event.  When it came to a background, I had just received Essex linen in Flax, and it was a perfect fit!  The textural differences between the linen and the Art Gallery are amazing!

Metro Twist

The blocks went together relatively quickly.  The pattern is written VERY well, with loads of diagrams and mathematics that makes sense.  Which is good, given my lack of mathematical ability.  Cutting the curves with the ruler was easy - although that first cut is very nerve-wracking!  The only tricky bit I found was because I used the linen - which is hard to determine a front from a back - so I resorted to labeling my piles of cut fabric "front facing downwards" and "back facing downwards".  This helped immensely!

Metro Twist

I think the biggest thing I have learnt from this first foray in to  these patterns (oh yes, there will be more!) is that even though it looks like all your curved pieces are cut exactly the same, they aren't necessarily.  That is, if the angle of your ruler isn't EXACTLY the same each time, your little curves will be different in the slightest little angle.  You don't notice it until you are sewing your blocks together, and your background diamonds are just slightly different in shape.  Clearly - this is not a massive deal!

Metro Twist

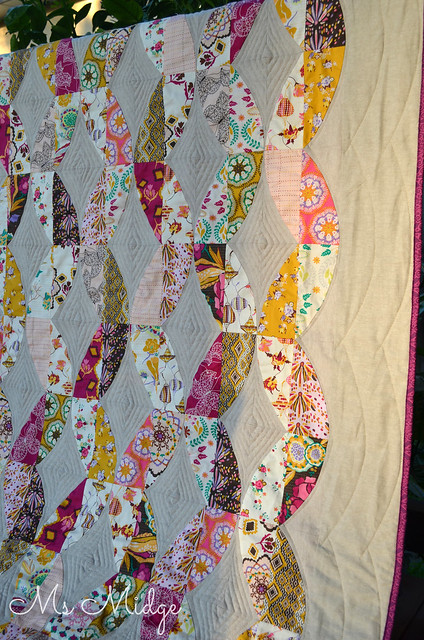
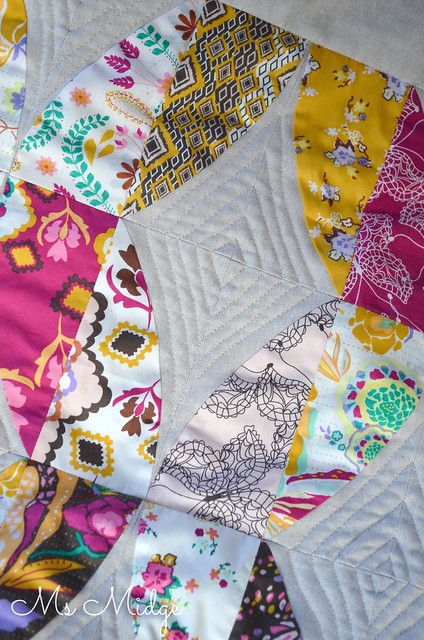
When it came to quilting this beauty, I wanted to keep it pretty simple.  Apart from the fact that this plan lead to a tonne of thread burying, I think it worked.  I used my free motion quilting foot to echo quilt the diamonds - from outside-in.  They are far from straight lines - very "organic" indeed.  And I was second guessing myself after the first few - but I really love them.  I haven't quilted on the prints at all.  And on the borders, I just echoed the curves using my walking foot, which I adore the look of.  All of the piecing and quilting was done with Aurifil #2000 50wt, which is such a beautiful golden thread it looks stunning with the linen.  


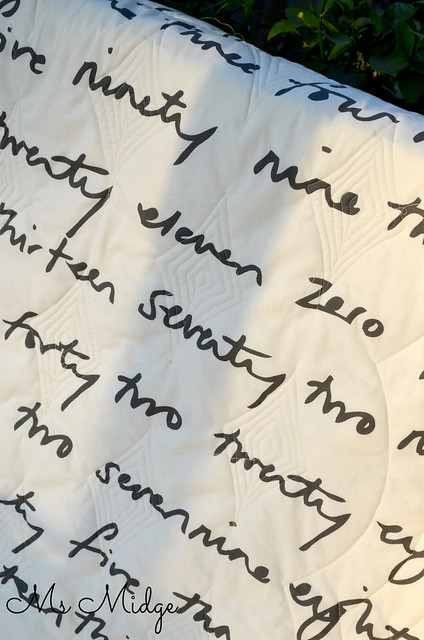
The backing, as you can see, is my go-to Ikea print.  This fabric seriously works with just about any quilt!

  Metro Twist

I also added a border to the quilt.  The finished size of the pattern is 40" x 55", which is a little on the smaller side of throw size for me - so I added 5" to each side and end, which brought the final size up to 49" x 64".

I also took a couple of little videos of myself sewing curves, and put them on Instagram.  If you want to have a little look, you can find them HERE and HERE.  I was trying to demonstrate curves not being as difficult as we think!  If you're willing to take your time and practice, I promise you can do it!

If you want to make the Metro Twist yourself, you will find the pattern HERE.  If you're in Australia and looking for a Quick Curve Ruler stockist, you can find a list HERE

 Please go and check out Jenny’s blog and shop. You can also join the Sew Kind of Wonderful mailing list to get news of any new patterns or promotions. There is going to be a linky party on the Sew Kind of Wonderful blog on Friday 29 through 31 August – you can link up any quilt or block made using the Quick Curve Ruler. If you haven’t tried a QCR project yet, never fear, there’s a chance to win a ruler during the bloghop and have a go. You can find plenty of inspiration on the bloghop so please go and check out the other participants!

Monday 18 August http://quokkaquilts.com
Tuesday 19 August www.cluckclucksew.com
Wednesday 20 August www.fromthebluechair.com
Thursday 21 August liveacolorfullife.net
Friday 22 August www.happyquiltingmelissa.com
Monday 25 August www.greenfairyquiltsblog.com
Tuesday 26 August http://blog.sewbittersweetdesigns.com
Wednesday 27 August www.pleasant-home.com
Thursday 28 August http://www.lucymade.wordpress.com AND http://msmidge.blogspot.com.au
Friday 29 August www.dontcallmebetsy.com

The bloghop is going to be followed by a 'Curve it up' Challenge Quilt-a-long on the Sew Kind of Wonderful blog starting in September, so join in the bloghop, get inspired and get ready to Curve It Up!  

CurveItUpQALbutton

Now it's your turn to show me your fabulous finishes this week!  Be sure to pop them in the linky below!  Have a wonderful weekend!


Tuesday, August 12, 2014

Sew Kind Of Wonderful Blog Hop

QCRbloghopbutton


It's true - I have signed up for a challenge - I'm participating in the first ever Sew Kind of Wonderful Blog hop.  Now, given I bought my Quick Curve Ruler back in April, and it's still sitting in its wrapping, very patiently I must say, I'm what you would call a "QCR Virgin".  Ahemmm......  Well, that's about to change!  I've just read through my first QCR pattern and although my head is about to explode with information overload, I'm doing what I do best - jumping in head first!

The blog hop is kicking off on Monday with the following amazing bloggers in showcasing the Quick Curve Ruler and patterns. We have:

Monday 18 August http://quokkaquilts.com
Tuesday 19 August www.cluckclucksew.com
Wednesday 20 August www.fromthebluechair.com
Thursday 21 August liveacolorfullife.net
Friday 22 August www.happyquiltingmelissa.com
Monday 25 August www.greenfairyquiltsblog.com
Tuesday 26 August http://blog.sewbittersweetdesigns.com
Wednesday 27 August www.pleasant-home.com
Thursday 28 August http://www.lucymade.wordpress.com AND http://msmidge.blogspot.com.au
Friday 29 August www.dontcallmebetsy.com

There will be plenty of chances for you to see the Quick Curve Ruler in action, and there will be giveaways galore, so make sure you check in on Monday for more details! The blog hop is going to be followed by a 'Curve it up' Challenge Quilt-a-long on the Sew Kind of Wonderful blog starting in September, so join in the blog hop, get inspired and get ready to Curve It Up!

  CurveItUpQALbutton

Watch this space!

Friday, June 13, 2014

Modern Medallion Finish!

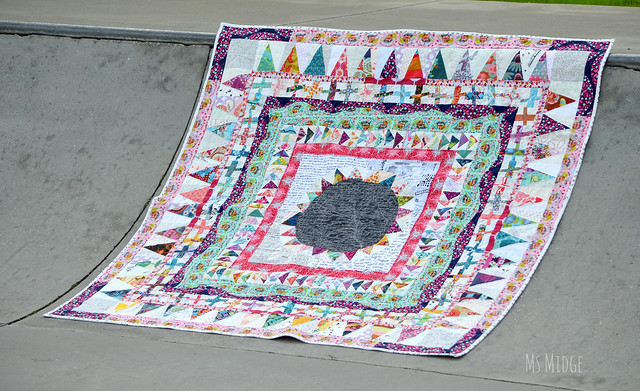
It is my day to wrap up this week on the Modern Medallion Quilt Along.  I got it stuck in my head a week or so ago that I would get it finished to show you all - and I meant, you know, a quilt top.  BUT - my "focus" (as my Wombat Stew friends so graciously call it) kicked in yesterday, and I put in a marathon effort.  I had it basted by lunchtime, and then put my foot down at 12.30pm.  Quilted by 5.15pm (bloody basketball training) and then did the binding at 10pm!  

I am SOOOOO absolutely thrilled with the end result, and am so glad that I took this project on.  I was really questioning my sanity on the first day - and many days through the process - but it has taught me a lot about my quilty self.  Firstly - I am not really an "improv" kinda gal.  I'm also not a "wonky" chick.  BUT - I am adaptable!

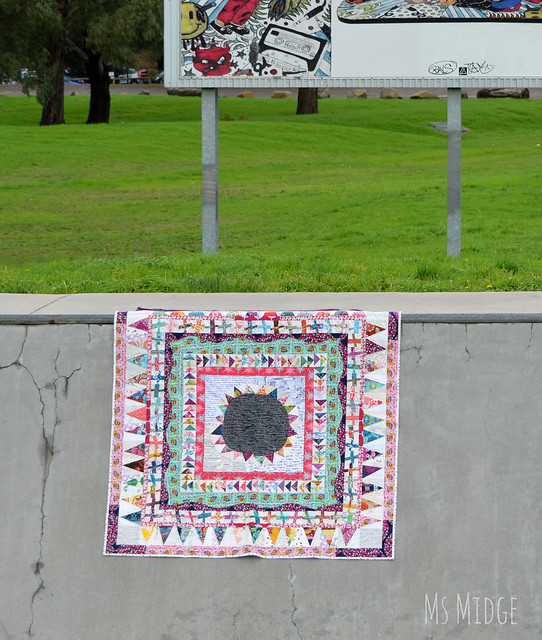
Without further ado, here my lovely friends, is my Modern Medallion Quilt - Anna Maria Horner style...

Modern Medallion

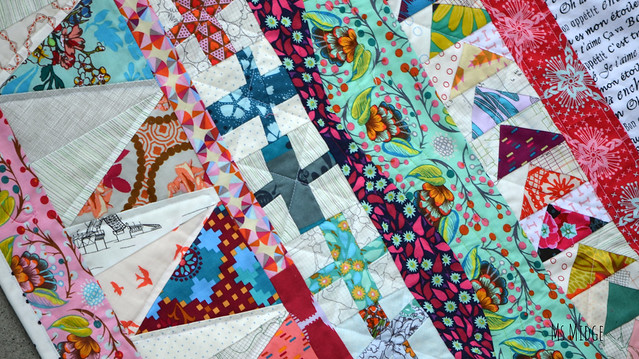
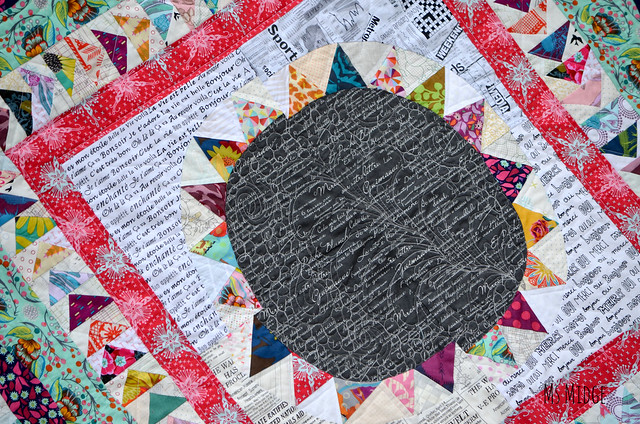
Isn't she beautiful?  ALL of the prints are Anna Maria Horner.  I think there are six fabric collections in total used.  And a good majority of the low volume prints are from Carolyn Friedlander's Architextures and Botanics ranges.  The finished size is 66" or 167cm square.  Backing fabric from Ikea & Field Study by AMH.  All pieced and quilted using Aurifil threads.
Modern Medallion 

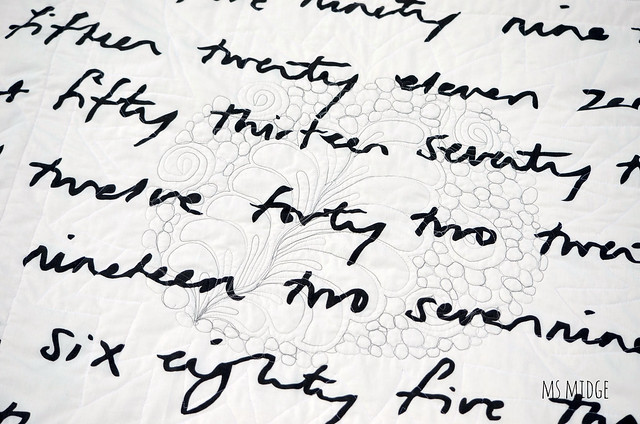
As per usual, I had no idea how I was going to quilt it, until the time came to quilt it.  I quite literally basted it all over the show, with no purpose other than to keep it together.  Then I rolled it up and sat at my machine.  And started with the centre medallion.  I used a beautiful variegated grey Aurifil 40wt thread, which you obviously can't see here, but will see later down the photo call.  One giant feather (well my feathers still look a bit like palm prongs!) and lots of little pebbles with swirls.  I will tell you now, it is FAR from perfect, but given the size of this giant, I tried my hardest to go slowly and to persevere.  I was NOT giving up on my FMQ dreams for this little lady.

On the outer points of the NYB triangles, I changed to my favourite #2024 white thread and free motioned straight-ish lines.  I've never FMQ'd straight-ish lines, but thought given the improv-ness (is that even a word!?!?) of the quilt, it would fit in well.  And it does!

Modern Medallion

Each border has a different quilting finish.  The red border has straight lines, wonky geese have a giant zip-zag.  My curved borders are divine.  The green has a yummy bright green Aurifil, echoing the curves.  And the blue has a hot pink doing the same.  It's much more fabulous from the back!  The wonky crosses got some cross-hatched action and the triangles, some more FMQ straight-ish lines.  And last but not least, the outside border is done using a variegated pink Aurifil, with some swirls.

Modern Medallion 

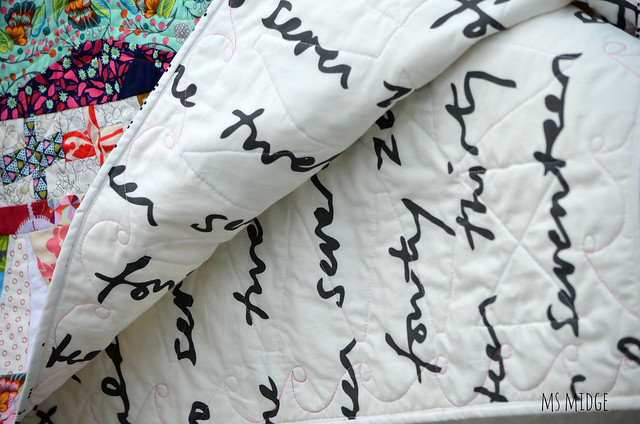
A little close up of the quilting on the back.  As I said - far from perfect, but imperfectly perfect in my eyes.

Modern Medallion

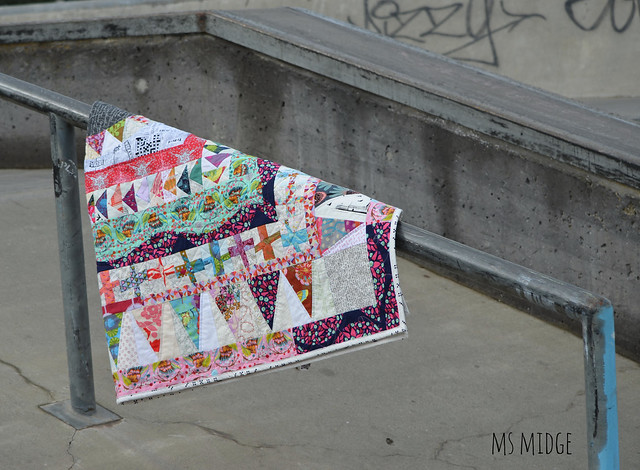
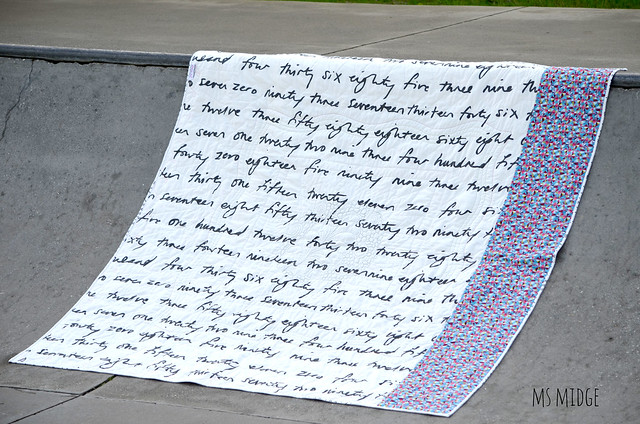
Just hanging around.....  I loved photographing this!  I stopped at the local skate park - lunchtime Friday - and there was a lone teenager sullenly watching me climbing up and down skate bowls and ramps in a dress, tights and boots!  I just kept wondering why he wasn't at school.....  Anyway - the binding......  I had another AMH print pencilled in for the binding, but when I asked my husband last night what he thought, he said it was too busy and his eyes couldn't focus!?  And suggested black & white.  I sulked, because I had no yardage of black and white.  Or did I?  I remembered I had some Waterfront Park domino dots, and quickly chopped it up and put it to work.  I LOVE it!

Modern Medallion

I love that the back fits in with the low volume scheme of things.  But am petrified at how grubby it will get whilst being used and loved!

Modern Medallion

And the glorious backside.  I had grand GRAND plans of using an amazing OOP AMH fabric.  But when I laid it all out - I didn't have enough!!!  Cue more sulking.  Then cue plan B....which entailed a quick trip to Ikea, solely for the purpose of this numbers print.  And in breaking news - I walked out of there ONLY with the fabric!  Unheard of.  Back to the backing......  I love the blue pinwheels down the side.  Love.  Have I said Love enough?

Modern Medallion

Le sigh.  I'd like to take this opportunity to thank Crystal for making her quilt and putting the call out for bloggers to join in the hop.  This quilt tested ALL of my quilting skills and patience - but I'm glad I persevered!  And I'd also like to thank Angie from Gnome Angel for making me laugh throughout!  And last but not least - I'd like to thank my husband!  Who, for the first time in my quilting history, had more to say about this quilt than any other.  And he used actual adjectives - lots of them!  This quilt is now His.  Well - Ours.

Now it's your turn to link up your progress! There's a linky down the bottom there for you to join up.  Make sure you drop in and leave a comment on everyone's blogs!  Encouragement is a quilter's best friend!


Wednesday, December 18, 2013

The Cushion For Christmas Blog Hop Winners Edition!

Firstly, I want to throw out a MASSIVE thank you to everyone who not only participated in the blog hop, but also just popped in and commented leaving your encouragement for everyone involved and also letting me know that you were inspired to get your cushion making skills happening!  If there was one thing I wished to gain from this experience, it was to see all you creative peeps becoming even more creative (who thought that was even possible?) and sharing said creativeness with the rest of the world!  In total, there were more than 70 cushions made and shared between the Flickr Group, emails and the linky!  That's amazing!  I'm so proud of you all!

But having said that…… I now have to pick a favourite.  As I have explained before, it's like being told to choose your favourite child (which for interest's sake THIS WEEK is Lochie!  The eldest received a bevy of awards for his efforts in year 9.  Ssshhhhh, I didn't choose ok?).  Given I clearly have no problem choosing my favourite children  on a weekly basis, surely I can choose my favourite cushion yes?  No.  I threw it open to the other fabulous bloggers who all worked very hard to help bring you this blog hop, and they helped make it more difficult by all choosing different ones!  But……. This is the conclusion I came to:

The winner of a $50 voucher to the Fat Quarter Shop, for having the most votes for Favourite Cushion is……..

Snowy, Pebbles and Pete
Mary Emmens!  Congratulations Mary, your gorgeous Snowy, Pebbles and Pete are fabulous!

Fat Quarter Shop - $50 Voucher!

Now on to the winners chosen for all our amazing runners up prizes……..

New Cushion
Congrats to Kathy for this gorgeous Waterfront Park cushion!  You have won a bundle of fabric from Polka Dot Tea Fabrics!

Polka Dot Tea - Fabric Bundle!
Xfactor pillow entry
And to Amy with this fab "Xmas Tree" low volume cushion.  You have won a $25 gift voucher to The Intrepid Thread!

Intrepid Thread - $25 Voucher!

This darling mermaid cushion by Good Golly Ginger was especially chosen to be one of the winners by my mermaid adoring five year old Chloe.  Apparently I now have to make her one!  Congrats to you Katie, you've won your choice of three paper piecing patterns from Quiet Play!

Quiet Play - Winner's choice of 3 Paper Piecing Patterns!

Personalised patchwork cushion
Erin from Missy Mac Creations!  You've won yourself a $20 voucher to Patternsonly.com!
Patterns Only - $20 Voucher


Cushion by Sew Surprising
Jan from Sew Surprising made quite a few awesome cushions!  This Pinterest one was a winner!  You've won a $20 voucher to The Oz Material Girls!
The Oz Material Girls - $20 Voucher

And last but certainly not very least is……

This super cute steering wheel cushion by Alisa at A stitch in Between!  Congrats!  You've won a fabulous pattern from Blossom Heart Quilts!


Aren't they all amazing?  I truly wish I had enough prizes to give everyone something!  To those who have won, I shall forward your email addresses to the sponsors so you can receive your goodies ASAP.  

Once again - thank you ALL so much!  I was so very nervous hosting my first ever blog hop, and even though it was in the middle of the most busiest time of the year, I have enjoyed every single moment of it!  Seeing all the wonderful cushions shared by my favourite bloggers and all of YOU has put a big smile on my dial and kept my spirits high!

So to everyone - I wish you a very Merry Christmas and I hope that all of the lucky recipients of your cushions are just as impressed as I!

xxxx

Monday, December 16, 2013

Monday Night Quickie…..

Just a quick post tonight…… Basically because I don't have time to scratch myself at present!

I just want to say - YOU'RE MAKING MY LIFE VERY DIFFICULT!  I mean, when I said "hey - make a cushion for Christmas", you took me literally!  You have to go and check out the very talented peeps who have linked up so far HERE and HERE.  And a reminder to the rest of you - you have less than two days left to link up if you want to go in the draw for the awesome prizes!  Link up closes at 10am Wednesday 18th December (EST Aust.).

That's all folks! xx

Saturday, December 14, 2013

It's A Wrap - Cushion For Christmas Blog Hop!

It's Day 14 of the Cushion for Christmas Blog Hop!  Which, sadly, means it's come to an end!  But on a very happy note - means you now get to…. SHOW ME YOUR CUSHIONS!!

But first, let's re-cap all the fabulous and inspirational bloggers who have shared their talents with you and I…..

There have also been some wonderful creations added to the FLICKR GROUP.  You don't have to have a blog to link up here - anywhere that your photos are hosted - and they have a URL - you can link them up!  If you don't have your photos hosted anywhere on the internet, then feel free to email me and I will add them for you.  Basically, I just want to see what you've created - any which way!

On to the prizes……


Patterns Only - $20 Voucher

The Oz Material Girls - $20 Voucher


Fat Quarter Shop - $50 Voucher!

Polka Dot Tea - Fabric Bundle!

Intrepid Thread - $25 Voucher!

Blossom Heart Quilts - Ornamental Quilt Pattern!


Quiet Play - Winner's choice of 3 Paper Piecing Patterns!

One GRAND winner will be chosen by me - based on creativity and technique/skills.  The remainder of the prizes will be awarded randomly!

The link will be open from right now until 10am Wednesday 18th of December (EST Aust).  Winners will be announced 8pm Wednesday 18th of December (EST Aust).

So you have the next few days to get any cushions started and/or finished and linked up!  Go on…..what are you waiting for?

Tuesday, December 10, 2013

Cushion For Christmas Blog Hop - Paper Pieced & Machine Binding Tutorial

I hope you're enjoying the Cushion For Christmas Blog Hop!  

Today is day 10 and if you head over to On The Windy Side, you will find Adrienne's fabulous quilted Christmas Cushion!


Cherry Christmas Wreath Cushion

Now - today I have another tutorial for you - How I machine bind….

I use this same method for my quilts, for many reasons, but mostly because A. I don't hand sew AND B. I don't hand sew…..

When it came time to bind my first ever real quilt, I searched the web for machine binding tutorials.  My friend Gemma also directed me to Red Pepper Quilts, where Rita had shared her technique.  So I started with that and then figured out I could never catch the binding on the back perfectly, so altered things a little to suit me.

First of all, measure up and make your binding.  I usually work with a 2.5" wide binding for cushions, but you can really make it as wide as you like.  There's a fantastic app by Robert Kaufman called Quilting Calculator.  HERE is a review of it.  I swear by it!

The delightful cushion I am sharing with you to illustrate said binding, is a paper pieced cover.

Paper Pieced Quilted Cushion

Paper Pieced Quilted Cushion

I used a pattern designed by Kristy @ Quiet Play.  You can find it HERE with all her other fabulous patterns.  If you're only new to paper piecing, it's a great pattern to try.  Also great for using up scraps.  I pulled out the scrap bag from my Swoon quilt.


As I mentioned on my Honey Honey Orphan Blocks Cushion, cushion covers are the perfect place to work on your free motion quilting!  So go for your life!  For this, I used a slightly different swirly pattern, sort of with an "eye" in the middle.  I love it!  I also just did some squiggles through the inside of the paper piecing.  I used my favourite and most used Aurifil #2024.  I now use it for all my piecing and garment making too.

Now, on to how I bind…

Once I've put my cushion cover together, sewing just shy of 1/4" around the outside, I work out how much binding I will need and get cracking…..

I then start sewing the binding on, 1/4" from the edge, on the BACK of my cushion/quilt.  When I start, I leave around 5" unsewn - sort of like a tail.  

When I get close to the edge, I stop about 1/4" before the corner, backstitch a bit….

Then take it from the machine like so….

Now it's time to prepare for mitred corners.  Take your binding and fold it back at an angle, making sure to line the bottom raw edge up straight with the edge of the cushion…..

Then fold it back over on to of itself….

Making sure to line up the folded edge of the binding with the edge of the cushion you have already sewn….

Place your cover back in the machine, and start sewing about 1/4" from the edge, backstitching a little, then continue sewing along the edge again.  Repeat this at each corner you get to….

When you get to the end, leave another tail, so you have a gap and two tails like above.  The wider the gap and longer the tails, the easier time you will have!

Lie your binding tails down flat on your cover and make them meet like this.

This will be where you join the binding, so you need to cut the tails off with about 1/4" - 1/2" for your seam.

Flatten the binding ends out and sew your seam at the width you left.

Your seam will look like this on the inside. You can see on mine there are two lines of stitching, that's because my guesstimate wasn't big enough to have my binding sitting flat enough!

Fold your binding in half at the seam, and you should have a nice flat binding!

Continue sewing the gap of binding together, and you will have one side done!

Now here you will see there are two rows of stitching.  The closest to the edge is the row from sewing the cover together, the second row is where I've attached the binding.  You want to pull your binding over from the other side, so that it just covers that second row of stitching.

Like this.  Now I know a lot of people like to use pins or clover clasp things, but I find it easiest to just use my hands.  I feel like I have more control!

Now your aim is just stitch as close to the edge of the binding as you can.  

When you come to the corner, slow down and leave your needle down.

Pull the fabric corner up from behind the cover.

Bring the bottom binding up and over your second row of stitching….. You will have a neat little fold in the side binding.

And then bring the side binding up over the stitching so that the little fold meets up with the edge of the bottom binding, giving it its mitred finish.

I then continue stitching down the binding as close to the edge, and hold my finger on the mitred edge as long as is physically possible before being squashed!  When I get to the corner, I backstitch a couple, then leave my needle down, turn the cover, and continue stitching.  I repeat these steps at every corner, and then I'm finished!

Finished from the back!

In theory, if you attach your binding this way, you "should" have a row of stitching on the back that is either very close to the ditch of the binding, or just on the binding.  I personally use this way, because as I said earlier, I can't get the stitching perfect enough attaching the binding to the front first!  And I'd rather some minor dodgy stitches on the back of my cushion/quilt than the front!

And finished from the front!
I still haven't decided who will be receiving this cushion for Christmas!  I'll have to see how naughty or nice people have been….

If you're new here, or catching up, head over to my original Hop post HERE for the complete schedule AND all the fabulous sponsors and prizes!  There's only four more days until I open up the linky for you all to add your creations!  Woot woot!


Ms Midge
Related Posts Plugin for WordPress, Blogger...