
Last year some time, I heard someone, somewhere, talking about table basting. Table what-ing?? I was sold before I even knew what it meant! I'd spent forever crawling around my lounge room floor, or tiled kitchen floor, basting my quilts - and my knees had had enough! I'm hearing a collective "ahuh" from you all right now aren't I? Since that lightbulb moment, I have somewhat perfected the process, and now enjoy basting don't hate it quite as much, and revel in my smooth quilt backs! I have repeated this process to numerous friends, who are all enjoying basting success also, so thought I'd share it with you all!
Now - the first rule is - you do not have to have a 10 seater dining table as I do!!! Baste your quilt on the table you have, and follow the same instructions. Having a smaller table just means you will have more overhang on the sides and possibly - ends of your table. The second rule is...... Well, there is no second rule. Let's go.....
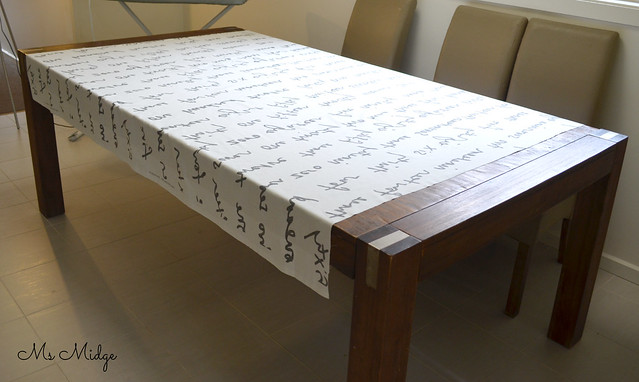
First step is to iron your quilt back to within an inch of its life. Make sure that baby is silky smooth without a crease in sight. Take said quilt back and lay it on your table. You want to have it centred as much as possible ie. the same amount of overhang on all sides.
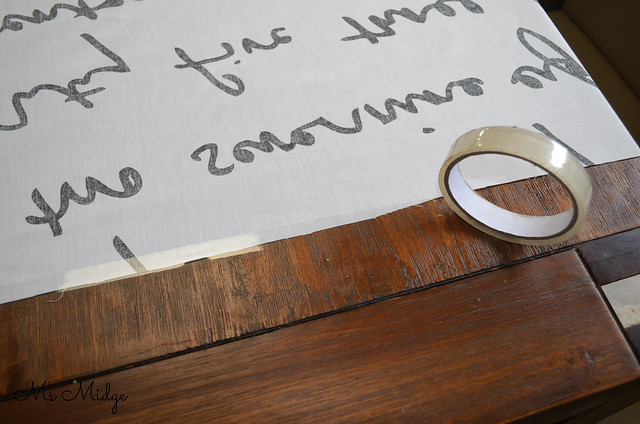
Then go and rummage through your kids art & craft supplies (or your own) and find your self some sticky tape (or cellotape - whatever it's called wherever you are!). You can use any tape at all - so if gaffa tape is all you have - make it work. You want to tape both ends down to your tape. Making sure you keep your smoothness intact! If you have a really small table and a really big quilt, you're going to have to get inventive! I've had others say they use bulldog clips etc. So think about what you have handy that's going to keep that quilt back in place!
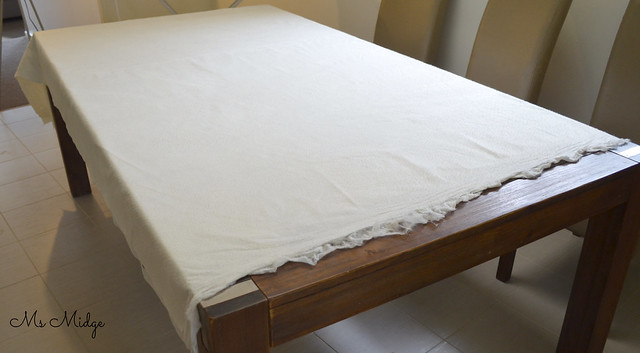
Once you have secured your quilt back, it's time to layer up. Lay your batting on top, using the same technique - centre it over your quilt back, with the same amount of overhang. Then smooth it all out, from the centre outwards.

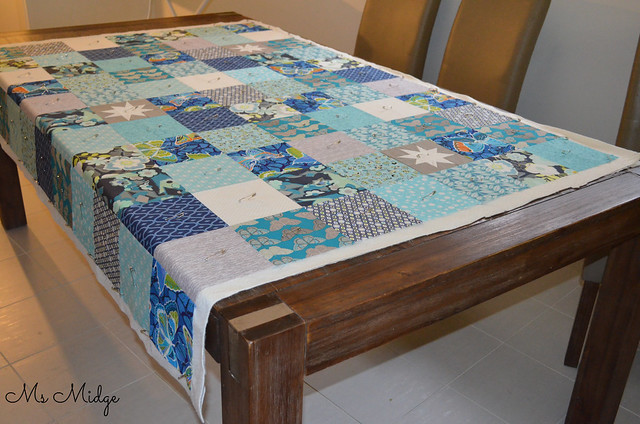
Same same again with your quilt top. Iron it super smooth, then pop it over the top! It's really important you follow the same theory as any basting process - and smooth it from the centre out. This way you will end up with a straight quilt top! I have been known to sometimes iron the quilt top once it's on top of the quilt sandwich - if it's been creased considerably in the putting on top of everything process.
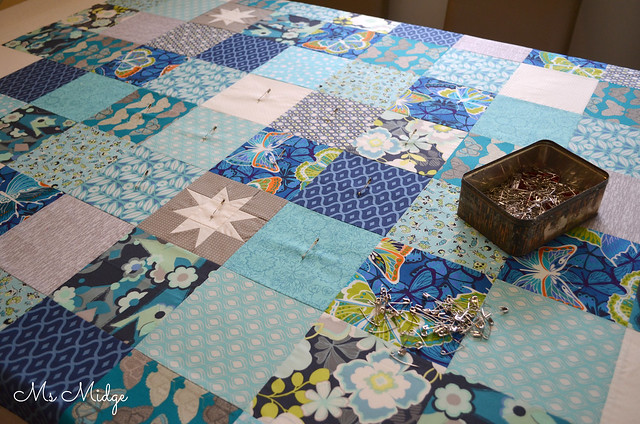
Now it's time to baste. I baste from the centre outwards - which is what I learnt through all my online learning. Use as many pins as you think your quilt warrants - but remembering the more pins the safer you're going to be! Once you've pinned all of the quilt top that is on top of your table, it's time to move on to the overhanging sections..... You need to remove your sticky tape for this to happen!
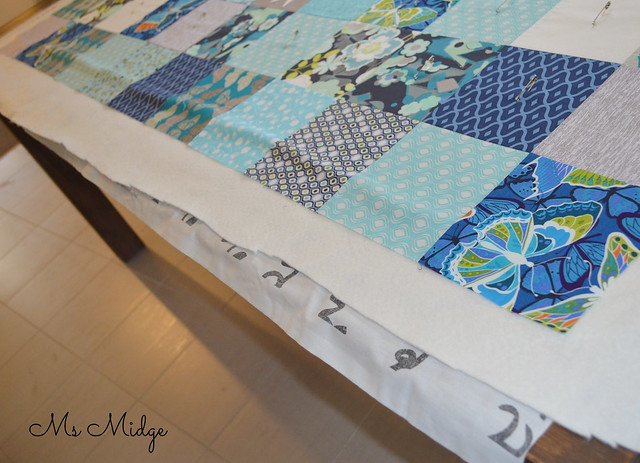
You want to go to the side of your table and with both hands, gently pull your quilt over to one side, revealing the overhang on the other side. You will see in the photo above that you have a big kink in the quilt sandwich? You now have to smooth that outwards and repeat all the other steps to baste that section.
Repeat again, by pulling the quilt over to the other side, which will reveal your last remaining section. Baste - AND YOU'RE DONE!
Once I have basted my quilt, I then roll it up ready for quilting and it usually sits on top of the lounge in the back room. Or if I'm really keen, I'll then set my machine up on the dining table and quilt it then and there!
I really hope you've found this helpful! I've seen/heard of tutorials for table basting which includes using lengths of timber (?!??!) but I'm a huge fan of keeping things as simple as possible, with as little props as possible. I think this method demonstrates that!
If you have any questions at all, feel free to fire away! As I said earlier in this post - I have never had a problem with my quilting using this method - no puckering, bunching up or folds in the back. If it works for me, I'm guessing it could work for you!

Looks to easy.. I will be trying this for sure. Thanks
ReplyDeleteI like the idea, but dont think it will work with my oval table unfortunately. I'm doomed to continue crawling around on the floor :-)
ReplyDeleteI've only ever basted baby quilts on the table (which I don't mind doing as its easier on the back!) and haven't really thought to do a bigger quilt. Just thought I wouldn't be able to. I recall when taught to baste that you don't even need to iron it if you tape it down correctly to the floor as it is pulled so taught but not stretched.. Clearly this won't work with the table. I'm going to give it a try next time.
ReplyDeleteI have to remember the scotch tape. I baste like this most of the time but I have a large cutting mat on my table as I don't want pins to scratch my table.
ReplyDeleteGoing to give this a try for sure. Beats crawling around on the floor.
ReplyDeleteI have seen this done with the pieces of wood but that just seemed like too much trouble. I'll definitely be trying this if I can get my dining table cleared up
ReplyDeleteClearing off the table...yeah...there's that! :)
DeleteGreat tutorial! Wish I could buy a bundle of the fabric that you used on this quilt! Love it!
ReplyDeleteIf I don't put my quilt on my frame and longarm quilt it, I do this too. Thank goodness I have a long dining room table. It makes this so much easier.
ReplyDeleteYep - that's what I do, too! Such a better way to baste!
ReplyDeleteHI !
ReplyDeleteYour post could not have come at a better time for me. I am a new, self taught quilter. I have 5 quilt tops completed and just couldn't figure out where to layer and baste. I have 2 cats and a few big, black hairy dogs. No matter how clean we are, the floor would never work for me - LOL !!! I am going to try this method this weekend. THEN, I have to brave trying to quilt these puppies, but that is a whole other story !
that's the way i do ir , my knees are to old for the floor
ReplyDeleteDo you find your table gets dinged with the pins occasionally scoring it?
ReplyDeleteI had the same question about the pins marking the table… also, does the tape ever leave a mark on the table?
ReplyDeleteYou did a lovely job on this quilt. It's simple, yet the pieced squares with the names add a special touch.
So a couple of things I can add, the blue painters tape works great for this , the large binder clips that u can get at any office supply store is what I use depending in how thick ur table top is, and several years ago I bought a dining table with several leafs in it from Ikea, it is almost as if it was created for this purpose!
ReplyDeleteMy table is 24x45! Takes me a little longer then you, but I get it done. There is no way I could crawl around on the floor to baste.
ReplyDeleteI have two six foot folding tables that I set up in my foyer. I tape them together with packing tape. I basted a lap quilt today with no overhang. This was my first time using safety pins with my tables. I have spray basted in the past but was not completely happy with the results on anything larger than a one yard baby quilt. The tables made pinning a snap compared to the same process on the floor. My knees are so happy tonight! Thanks for the tips. I will use them to improve my technique next go round.
ReplyDeleteI agree Midge. This method is so easy. I use one of those folding trestle tables. I do the sandwich the same way, and then........ I fold back the top across the width, followed by the batting leaving the taped backing half exposed. Then out with the 505 basting spray. Spray exposed part of back, move backing back in place and spray that, the top back. I smooth each layer as it is replaced. Then repeat the process with the other half. If I need to pin I put a few pins in.
ReplyDeleteBut pins with my glass coffee table... Or my new hard wood floors?! I guess I need to slide my cutting board around underneath? Or find a piece of cardboard that's sole purpose in life is to help me table baste.
ReplyDeleteI've only ever table basted. I feel sorry for those if you who weren't taught this method when you first started quilting! Now that I've swapped to spray basting I do use the floor. Also, in my house using a table top means clearing a whole lotta stuff off first!
ReplyDelete